Pub Invest — Staff Guides
Printed copy generated 6 September 2026.
The current version is online — check the date there before relying on this copy.
Staff guides
This site is the current version of Pub Invest's staff documentation. Every page shows when it was last updated, at the bottom.
If you are holding a printed copy, check its date against the page here before relying on it.
What is here
- CRM user guide — contacts, groups, entitlements, offers and reporting. Start at Concepts if the system is new to you; go straight to Reference if you are trying to work out why an offer is not showing.
- Case management — cases raised automatically from voicemails and by hand, how to find one, work it and close it. If you are looking for the Voicemails screen, it is gone — what happened to it and how to get your old working list back.
- Promoted items & societies — promoting menu items to venue websites, and managing societies.
CRM ↵
User guide ↵
Part A · Concepts
Contacts, groups, entitlements, offers and reporting: what the pieces are, how to use them, and how to work out why something is not showing.
What the pieces are and how they fit together. Read this once; it should stay true even as the screens change.
A1 · The shape of the system
Offers are not created in the CRM.
They are created in the POS, on the till, and imported. If an offer is missing, your first question should almost always be about the deal in the POS — not about the CRM.
This is the one idea the rest of this guide leans on, so it is worth stating plainly before anything else. If you go looking for where an offer gets created, you will not find it in the CRM. A deal is set up in the POS, used at the till. Nothing in the CRM writes a deal into existence. The CRM's job starts after that: it imports what the POS already has, decides who is allowed to see it, and reports on what happened when customers used it.
Deals are imported every five minutes. For every venue, the import reads that venue's current list of deals from the POS and turns each one into an offer in the loyalty database. There is no button in the CRM that triggers this. If you have just set a deal live in the POS, expect it to appear as an offer within about five minutes, once the next run comes round — not instantly, and not something you need to chase by hand.
The one thing to understand first
Every deal the POS returns is imported.
The import used to keep only the deals marked loyalty-only in the POS and discard the rest. That filter has been removed: every deal the POS returns for a venue becomes an offer. Whether a customer ever sees it, and which list it appears on, is decided afterwards — not by whether it made it into the CRM at all.
That change matters because it moves the interesting decisions downstream of import. Two things decided later, from data already sitting on the deal in the POS, are what actually control a customer's experience:
- Whether anyone can see it at all. A deal without Publish to App ticked in the POS is imported but held in preview. No ordinary customer sees a preview offer; only a preview reviewer can, so that someone can check it over and sign it off before it goes live to customers. If you are wondering why a deal that is clearly live at the bar is still not showing to customers, that is expected: till visibility and Publish to App are two separate settings in the POS, and only Publish to App decides whether customers can see it. A deal can be selling at the till and still be awaiting its app sign-off at the same time.
- Where it lands once it is visible. A deal that carries one or more loyalty groups in the POS becomes a VIP offer, restricted to members of those groups. A deal with no loyalty groups at all becomes an ordinary Offers entry, open to everyone. So if you are trying to work out whether a deal will land in VIP or Offers, look at its loyalty groups in the POS — not at the old loyalty-only setting, which no longer has any effect on where a deal ends up.
One more downstream detail worth knowing early: a deal imported with no app copy in the POS — no name written for it yet — is stored under the placeholder name Untitled deal followed by its POS deal id. That is deliberate. Rather than fail the whole venue's import over one deal nobody has finished writing up, the import gives it a name you can search for, so you can find the deal that still needs copy rather than losing it entirely.
POS                    loyalty database              customer app
─────────────          ────────────────              ────────────
deals defined    ──▶   the import creates      ──▶   offers the
by the venue           an offer for                  customer
                       EVERY deal                    qualifies for
                              │
                              ├─ "Publish to App" ticked in the POS?
                              │  no ─▶ preview reviewers only
                              │
                              └─ carries loyalty groups?
                                      yes ─▶ VIP        no ─▶ Offers
An offer is never typed into the CRM. It arrives from the POS, and two settings in the POS decide who can see it.
Keep this shape in mind through the rest of Part A: contacts, groups and entitlements are all about who qualifies for an offer once it exists; none of them are about where the offer itself came from. If something looks wrong with an offer's name, its timing, or which deals exist at all, look in the POS first — not in the CRM screens covered later in this guide.
A2 · Contacts
A contact is one person: a name, a mobile number and/or email address, a date of birth, and the groups they belong to. Every offer, entitlement and report in this guide ultimately comes back to one person's contact record — A3 onward is about how a contact gets sorted into the groups that decide what they see, so it is worth being precise here about what a contact actually is and where it comes from.
A contact usually comes into existence the moment someone signs in to the app for the first time. If their email already matches an existing, unclaimed contact — one nobody has linked a sign-in to yet — that record is claimed and reused rather than duplicated; only when there is no unambiguous match is a new contact created. That first sign-in also backfills whatever the app already knows — name, email, mobile, date of birth — into whatever fields on the contact are still blank. It never overwrites a value that is already there, so a name you have corrected in the CRM will not be replaced by a stale claim from a later sign-in.
Two other routes matter enough to name:
- A registration source. A campaign link or QR code a contact arrives through. Applying one can add a contact to one or more groups at the moment they sign up — a way a contact ends up in a group without you adding them by hand in the CRM. You will meet registration sources again in Part B.
- The till. A physical loyalty card is created ahead of time as a blank placeholder — no name, no mobile, just a long unique code printed on the card — and only becomes a real, identified contact when someone claims it at the till with their name and mobile number. Claiming fills in who they are; it does not by itself put them in any group.
Whichever route creates it, what actually identifies a contact day to day is their mobile number or email address — both are searchable fields in the CRM's contact search, alongside name.
A3 · Groups and the tree
Groups form a tree, and membership is read upward.
A contact's groups are not just the ones they were directly added to. Every group above those, all the way up the tree, counts too. This one fact is behind most "why can this person see that offer" questions, so read this chapter slowly even if you skip the rest of Part A.
Every group can have a parent, and a parent can have its own parent, and so on — that is the tree. When the system works out which groups a contact belongs to, it does not stop at the groups you put them in directly. It walks up the tree from there, collecting every ancestor along the way, and treats the contact as a member of all of them. A member of a child group already receives everything the parent group offers, with nothing extra to set up.
Students ─────────────── offers here reach EVERYONE below
   │
   ├── Freshers 2026 ────── and everyone in here
   │
   └── Societies ────────── and everyone in here
          │
          └── Chess Soc 25/26
                 │
                 └── a member here receives offers from
                     Chess Soc, Societies AND Students
Membership is read upward, never downward. A member of the deepest group inherits every ancestor’s offers.
Two consequences follow directly from this, and both matter for how you use the CRM:
- Putting an offer on a parent group reaches every descendant's members. Restrict an offer to Students in the diagram above and a member of Chess Soc 25/26 sees it, even though nobody ever added them to Students directly. If you want an offer to reach the whole tree, restrict it to the root, not to every leaf.
- Nesting a group under the wrong parent silently widens who gets an offer. Move Chess Soc under Students by mistake and every one of its members instantly inherits every Students-restricted offer — with no warning, and nothing on the offer itself changes to tell you. The mistake lives in the tree, not in the offer.
When you are trying to work out why someone can or cannot see an offer, always ask the same question: what does this contact's branch of the tree look like, read upward from wherever they were actually added? A4 covers the different kinds of group you will find in that tree, and A6 puts groups back together with the other two ways an offer can reach someone.
A4 · The three kinds of group
Not every group in the tree behaves the same way. There are three kinds, and the CRM enforces the difference rather than just documenting it — an edit that would break one of these rules is refused before it can be saved.
| Kind | Has members | Can have children | Shape editable |
|---|---|---|---|
| Ordinary | Yes | Yes | Yes |
| Society year-managed | Yes | Yes | No — name and parent are set by the academic-year clone |
| Entitlement pool | No | No | Yes |
Society year-managed groups
A society's tree — the society itself, and the year groups underneath it — is built and rolled over automatically by the academic-year clone. You cannot rename one of these groups or move it to a different parent. That is not an arbitrary restriction: a group hand-added inside a year subtree is either left behind when the clone rolls the tree over to the next year, or, through the same upward walk covered in A3, drags its members into the wrong year's offers. Neither failure shows up when you make the change — only later, when an offer misfires for people who should not have had it, or fails to reach people who should. The rule exists because that mistake is invisible until it is already a problem.
Only the shape of a managed group is locked. Its stop date, whether it requires photo ID, and its entitlement terms if it is also a pool, all stay editable — an admin fixing a photo-ID setting mid-year is an operational change, not a structural one, and is never blocked by this rule.
Entitlement pools
A pool is a group with nobody in it. Its offers exist and are restricted to it exactly like any other group's offers — but because it has no members, the only way a person gets one of those offers is an individual grant (A5). Two edits are refused because of that: you cannot turn a group into a pool while it still has children, and you cannot parent anything — pool or ordinary group, at any depth — beneath one. Both come from the same leak: the upward walk in A3 does not know or care that a group is a pool, so a group sitting beneath one would hand every one of its members the pool's offers automatically, with no grant, no record of who was granted what, and no way to see it happened. The CRM refuses both edits outright rather than let it happen silently.
A pool itself can still sit under an ordinary parent, though — that is not the restriction. Nothing walks down from a group to its members, so a pool having an ordinary group above it creates no leak in either direction: the parent's members do not inherit the pool's offers, and the pool still hands out nothing except by grant.
A5 · Entitlements
An entitlement pool (A4) has no members, so its offers cannot reach anyone through the tree the way an ordinary group's can. The only way a person gets one of a pool's offers is a grant: an individual record that says this one contact may use this one offer.
A grant carries three things:
- Uses allowed. How many times the grant can be redeemed.
- A validity period. Its own start and end dates. Leave these blank and the offer's own visibility dates apply instead — the grant only needs its own window when it should run on a different schedule from the offer itself.
- A display reason. The offer card always starts with "Just for you"; a display reason is appended to it, not shown in its place. Leave it blank and the card reads exactly "Just for you". Type Happy Birthday! into it and the card does not read "Happy Birthday!" — it reads "Just for you · Happy Birthday!". Write the reason with that prefix in mind, not as a standalone line.
Think of the pool as the shelf of offers and the grant as the individual person's ticket to one of them: the shelf decides what exists to be granted at all, and the grant decides who gets a copy, how many times they can use it, and for how long.
A6 · How an offer reaches a customer
A1 covered where an offer comes from: a deal in the POS, imported automatically. This chapter covers the other end, and it is the one you will reach for most often: once that offer exists in the CRM, there are exactly three ways it can reach a customer, and when someone asks you why a customer cannot see one, you are really asking which of these three was supposed to apply.
An offer reaches someone in exactly one of three ways:

  1. PUBLIC        the offer is public and in its visibility window
                   → everyone sees it

  2. BY GROUP      the offer is restricted to a group
                   → members of that group, AND of any group beneath it,
                     see it (the upward walk again)

  3. BY GRANT      the offer belongs to an entitlement pool
                   → only someone individually granted it sees it,
                     for as many uses and as long as the pool allows
If a customer cannot see an offer, it is because none of these three applies. Part D walks the causes in order.
The first route needs nothing extra: an offer with no restriction group at all is open to anyone, as soon as it is published and inside its visibility window. If you are checking a public offer, that window and whether it has been published (A1) are the only two things worth looking at. The second is the group tree from A3 — restrict an offer to a group and it reaches every member of that group and of everything beneath it, never just the group named on the offer, so when you are chasing this one, check the customer's whole branch of the tree, not just the group the offer names. The third is A5's entitlement pools: an offer restricted to a pool reaches nobody by membership, because a pool has none, so a grant is the only door in — if you are looking at this route, what you need to find is the grant itself, not a group membership that will never exist.
Those three routes are the whole answer to "who can see this offer." There is no fourth path around them for an ordinary customer — if one cannot see an offer, the cause is always that none of the three applies, and working out which one was expected to apply is where D4 starts. The one person this does not describe is a preview reviewer, who by design sees preview offers regardless of group or grant, so they can sign a deal off before it reaches anyone else; that exception is covered on its own in Part D.
Part B · Contacts and groups
How to do the things you actually do, and what happens when you do them. Assumes CRM access.
B1 · Contact management
Finding a contact
Where to find it. CRM → Contacts.
Search by name, email or mobile number, or narrow to a top-level group, a verified state, or whether the record is a physical card. The results list shows each contact's name, email, phone, whether they are active and verified, and a Physical or App pill for how they registered (A2). A small image icon marks a contact who has a photo on file.
Tick rows to act on several contacts at once. The bulk action list beneath the table covers:
| Action | What it does |
|---|---|
| Add to group | As B1 describes for one contact at a time, but for every ticked row. Entitlement pools are not offered here — a pool has no members by design (A4). |
| Remove from group | The same, in reverse. Unlike Add to group, its group picker is not filtered — pools are listed here too, even though nobody is ever a member of one to remove. |
| Disable | Sets each ticked contact to inactive. Asks for confirmation first, since it applies to the whole selection at once. |
| Send offer | Sends one chosen offer to every ticked contact it actually applies to — but "applies to" is checked narrowly: only a group the contact was added to directly, not a group they qualify through by being under it in the tree (A3). Someone who only qualifies by inheritance — a member of a society under a restricted parent group, say — can be silently skipped by this action even though the app shows them the offer. It is not the same check the app itself uses. |
| Verify | See below — not the same as ticking Verified on the Details tab. |
| Send wallet request | Sends a wallet-pass signup prompt to anyone ticked who does not already have one. |
The detail page
Click a row to open the contact. The heading shows their photo (if they have one), their name — or their email, or Contact #\<id> if neither is on file — and underneath it their email, mobile and registration date.
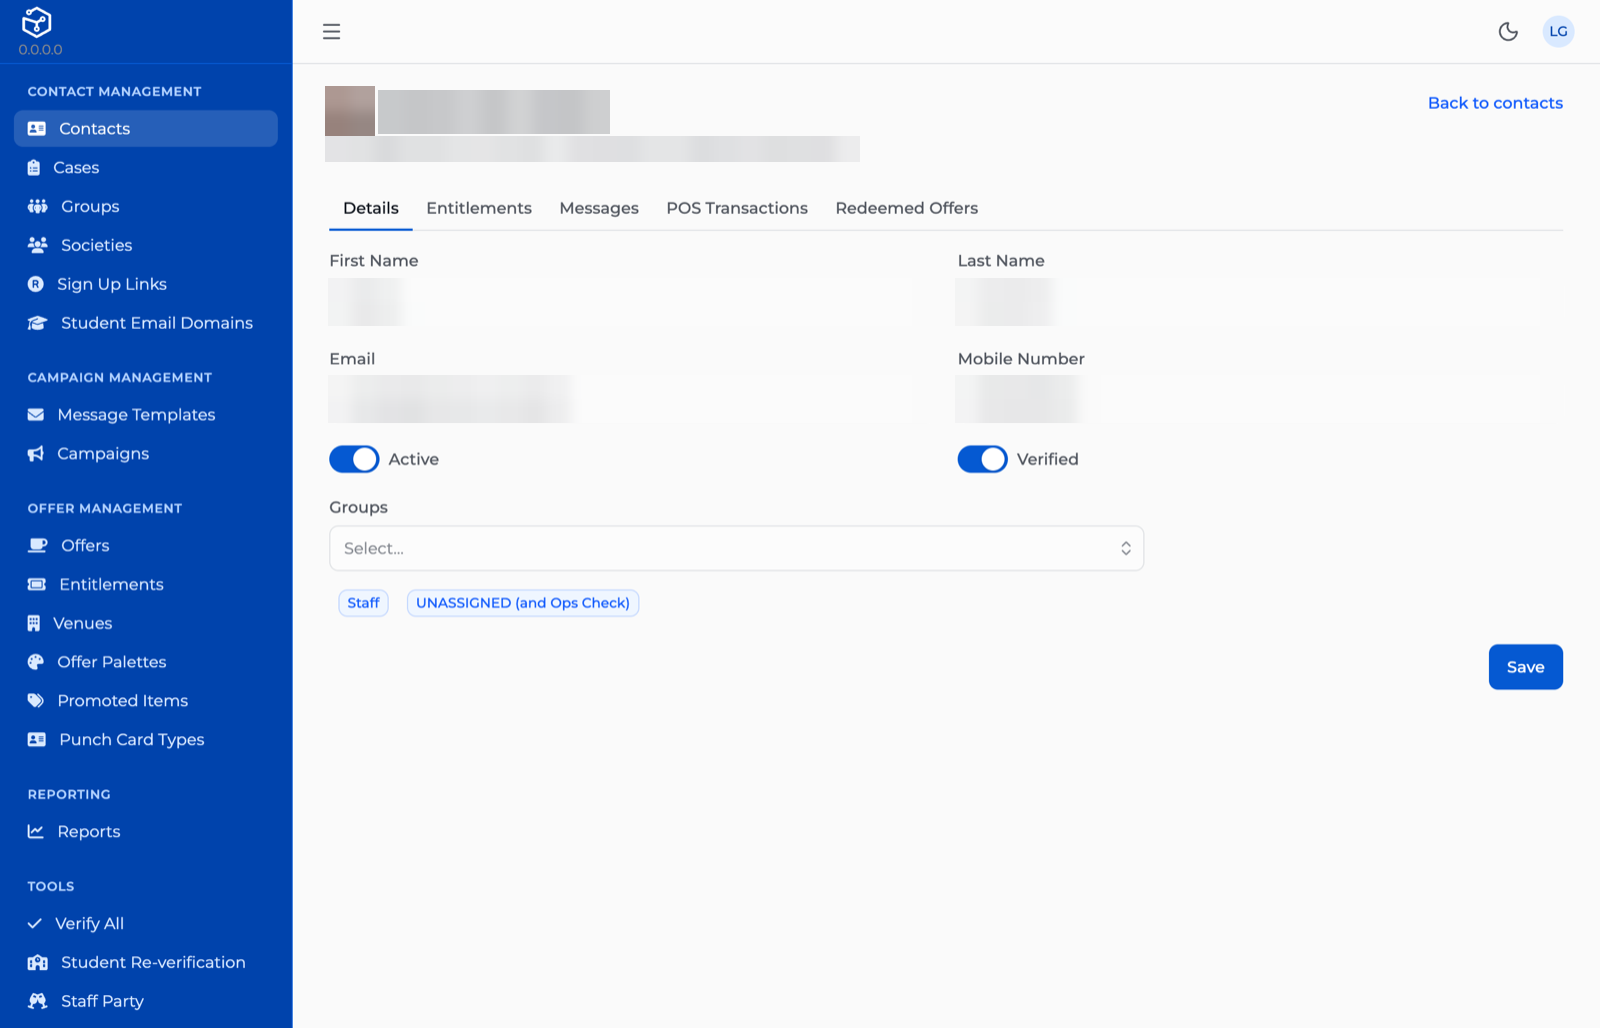
The contact detail page. Everything the rest of B1 acts on is here: the identity fields, the Active and Verified toggles, and the groups they belong to. The personal details are blurred out in this guide — on screen you will see the real ones.
Five tabs sit below the heading: Details, Entitlements (A5's grants, for this one person), Messages, POS Transactions and Redeemed Offers, the last two being read-only history. Details is the one you will use most, and it holds:
- First Name, Last Name, Email, Mobile Number, Active, Verified. Editable if you hold
contact:edit; otherwise the page shows you everything but the fields are locked, with a note that editing needs that role. - Groups. Pick a group to add it, or click an existing chip to remove it. As with the bulk action, entitlement pools do not appear in the picker — you cannot add a contact to a pool this way, because a pool has no members (A4). Saving the form is what actually applies any group changes you have made.
Date of birth is not one of them. It is part of the contact record (A2), but the Details tab neither shows it nor lets you change it — see age gating, below, for what depends on it.
Verification
A contact is Verified or not — the same state the app itself sets when someone confirms their own sign-up. There are two ways to change it from the CRM, and they do not do the same thing.
- Ticking Verified on the Details tab and saving. This only changes that state. Saving the form does the ordinary contact save, applying the fields and groups on the form — nothing else. No offer is sent, and nothing is shown to say otherwise.
- The search list's Verify bulk action. This changes it and, for a contact who arrived through a registration source (A2), sends them that source's sign-up offers there and then — the confirmation dialog says as much. It only fires on the change from unverified to verified: running it again on someone already verified does nothing, so re-selecting a mixed batch will not resend anything to the ones it already caught.
The two are not interchangeable.
Ticking Verified on one contact's Details tab and saving sends them nothing. Using the bulk Verify action on that same contact sends their sign-up offers. If the point of verifying someone is to release those offers, use the bulk action — even for one contact — not the checkbox.
Duplicate accounts
There is no CRM screen for merging two contacts. Merging is primarily something that happens on its own today, when someone claims an account in the customer app, once they have proved by SMS that a mobile number is theirs. A behind-the-scenes tool sits alongside that — start a merge, list what is pending, cancel one — but nothing in the CRM is built on top of it. If two contacts genuinely need merging by hand, that is a request to engineering today, not an action here.
Photo and age
If a contact has submitted a photo, clicking their avatar at the top of the detail page opens it full-size, with a Delete Photo option. That is the only thing the CRM does with it — there is no upload here. A customer's photo comes from the app itself, and is only stored once a facial-recognition check has accepted it. Whether a contact needs one on file at all is decided by the groups they belong to, not by anything you set on the contact: any group can be marked with Require Photo ID, which then applies to everyone in it.
Age works the same way, one level up: a contact's date of birth — entered by the customer, not by you — is all that decides whether the app treats them as an adult. There is nowhere on the contact record in the CRM to see or correct that date today.
Bulk contact import
Where to find it. CRM → Contacts → CSV Upload.
A2 covered the three routes a contact arrives by in normal running. This is a fourth, deliberately left out of that chapter because it is something an operator does, not something that happens on its own.
- Open CSV Upload from the Contacts page. Download the template from the dialog if you need it.
- Choose the group every row will be added to. As elsewhere, pools are not offered — they have no members to add.
- Choose the file and press Upload.
The file needs exactly four columns: First Name, Last Name, Mobile Number and Email Address. For each row, the mobile number is matched against existing contacts: a match is added to the chosen group (if not already in it) and otherwise left alone — a different name or email in the file does not overwrite what is already on record. No match creates a new contact, active but not yet verified, in the chosen group straight away.
One bad row stops the whole file.
Every row is checked for all four fields before anything is written. If even one row is missing a name, mobile number or email address, the upload is rejected outright and nothing from the file is imported — not just the bad row. Fix the file and upload it again.
A second, narrower CSV tool lives at CRM → Staff Party (admin only) for one-off event guest lists. Its file carries a Type column, and it sorts each row into one of two fixed groups depending on whether that column reads "Staff Member" — you do not choose the destination group, and it is not covered further here.
B2 · Group management
Where to find it. CRM → Groups.
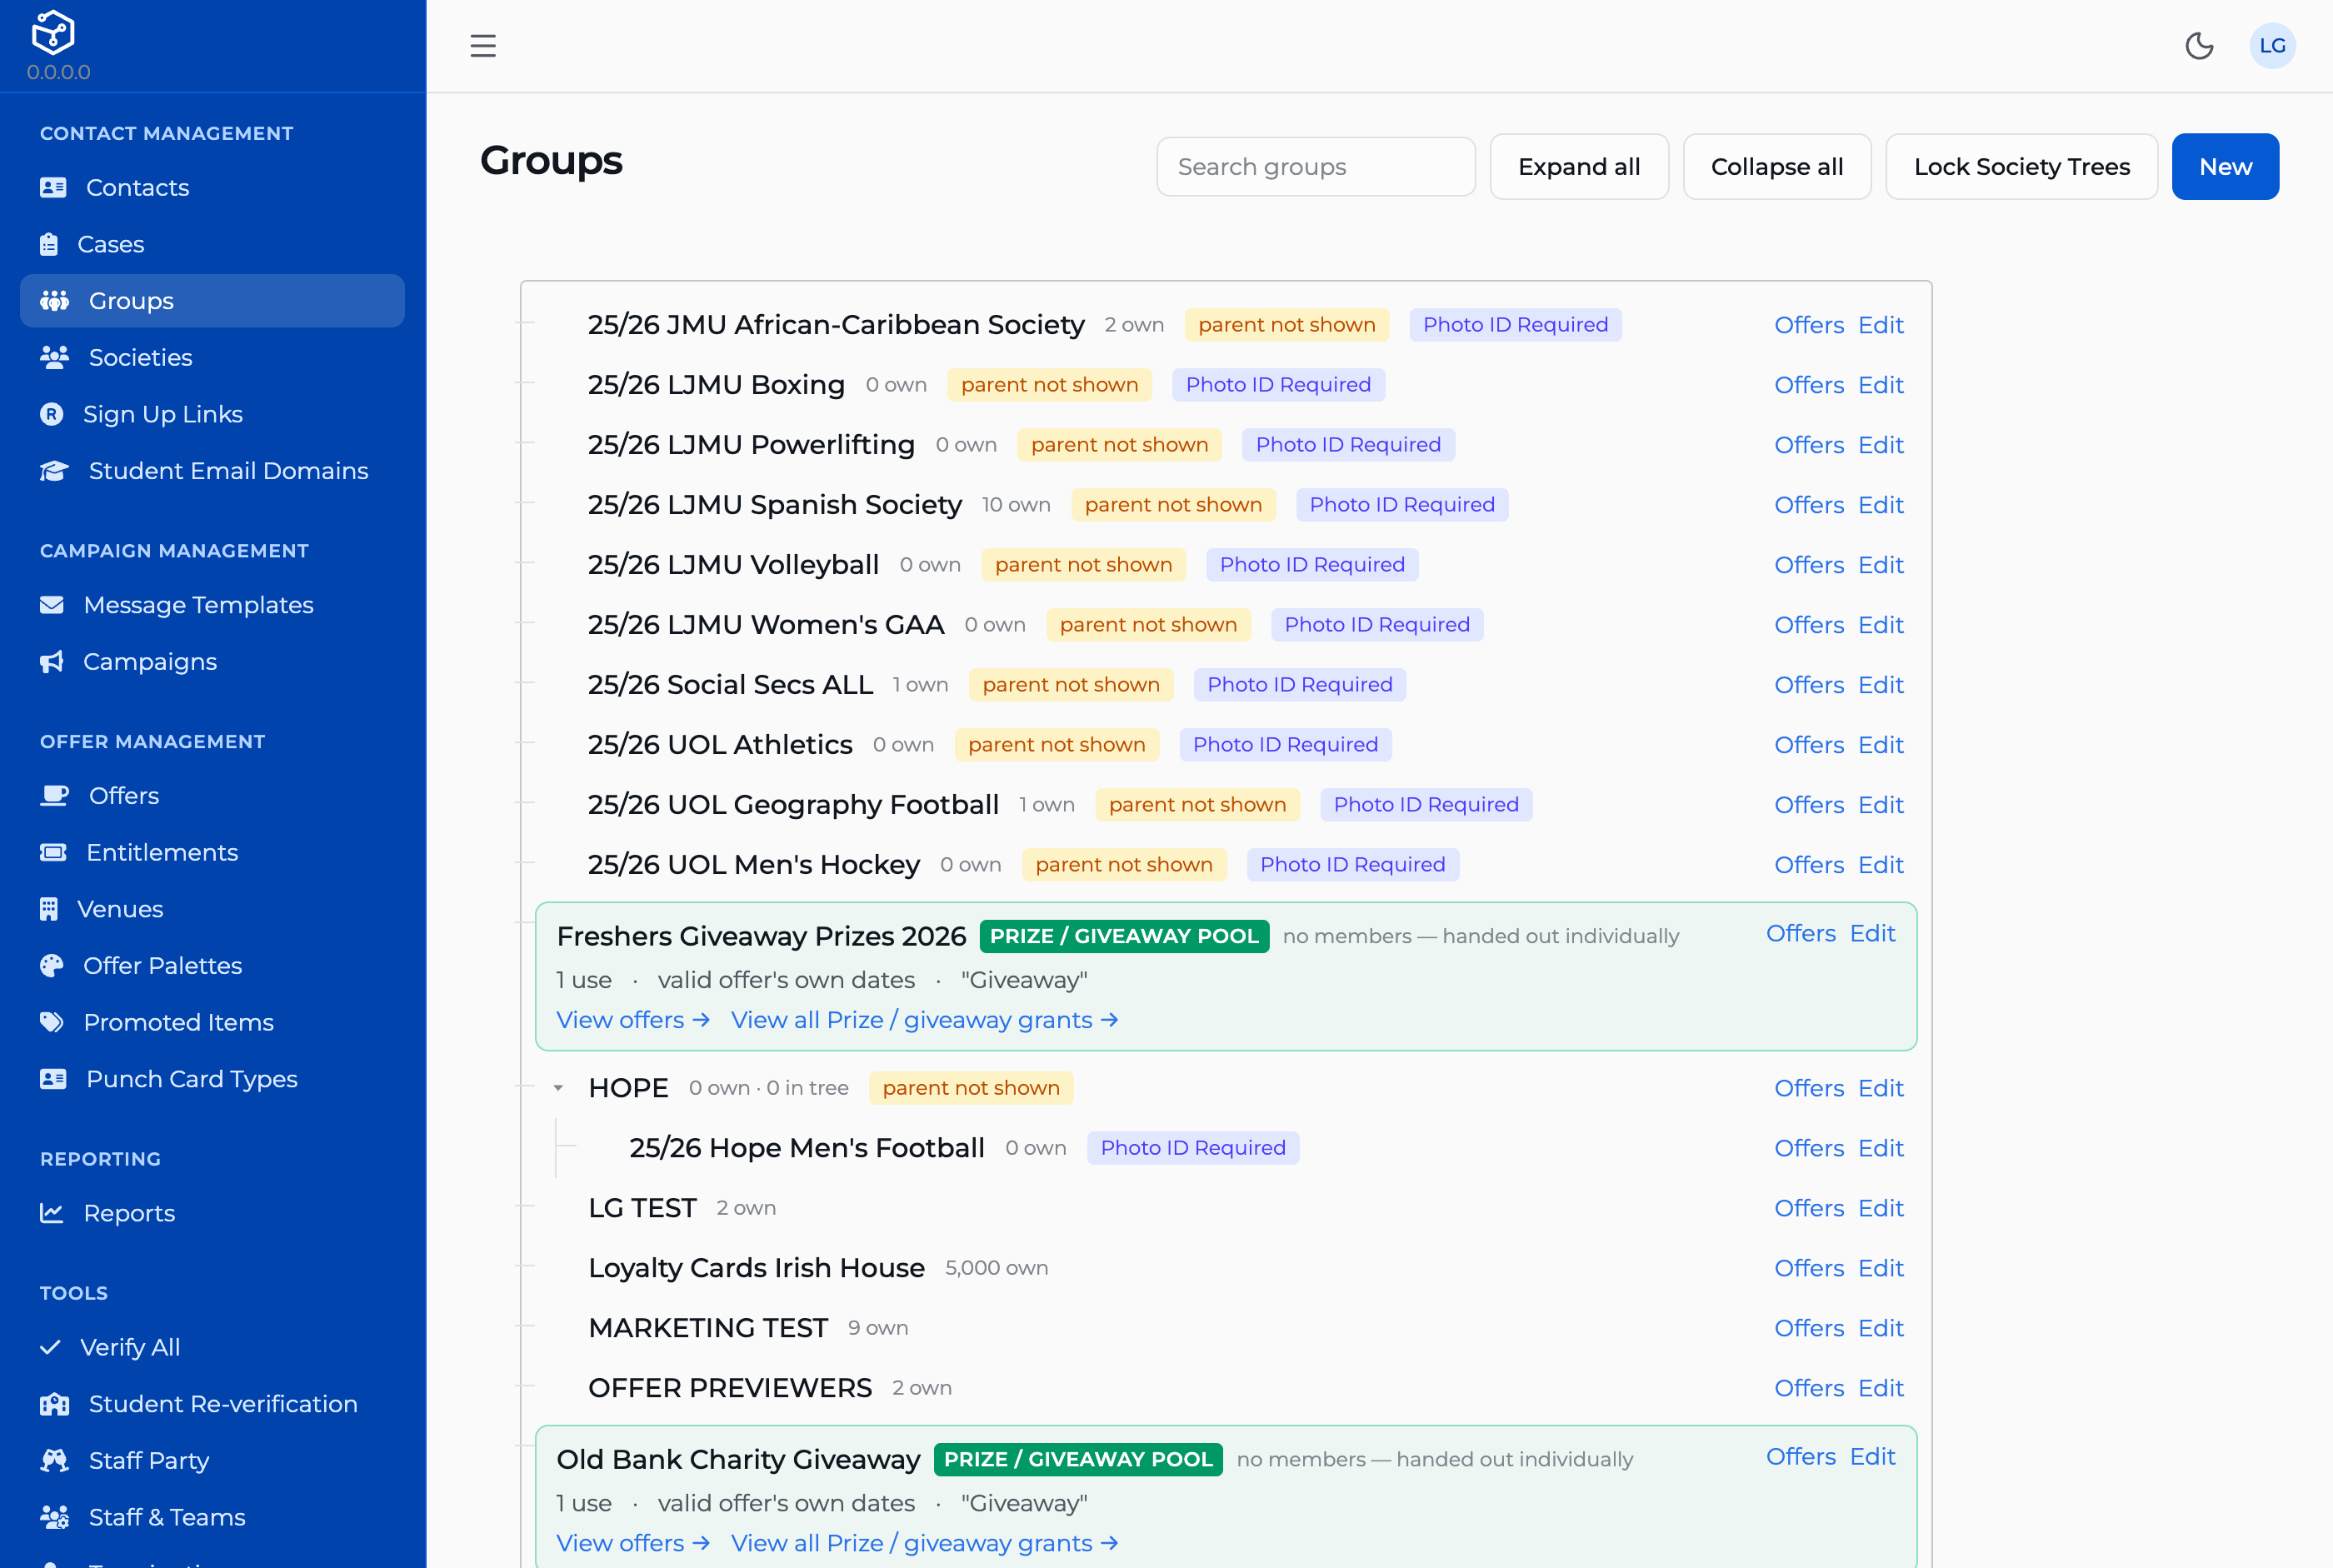
The Groups screen.
Creating a group, and choosing its parent
- Press New.
- Give it a Name.
- Pick a Parent Group, or leave it blank to create a root.
- Set Stop Date/Time and Require Photo ID if they apply.
- If you hold
entitlement-group:edit, you may also turn it into an entitlement pool here (A4, A5) — leave Entitlement Pool Type on "Not a pool" for an ordinary group. - Save.
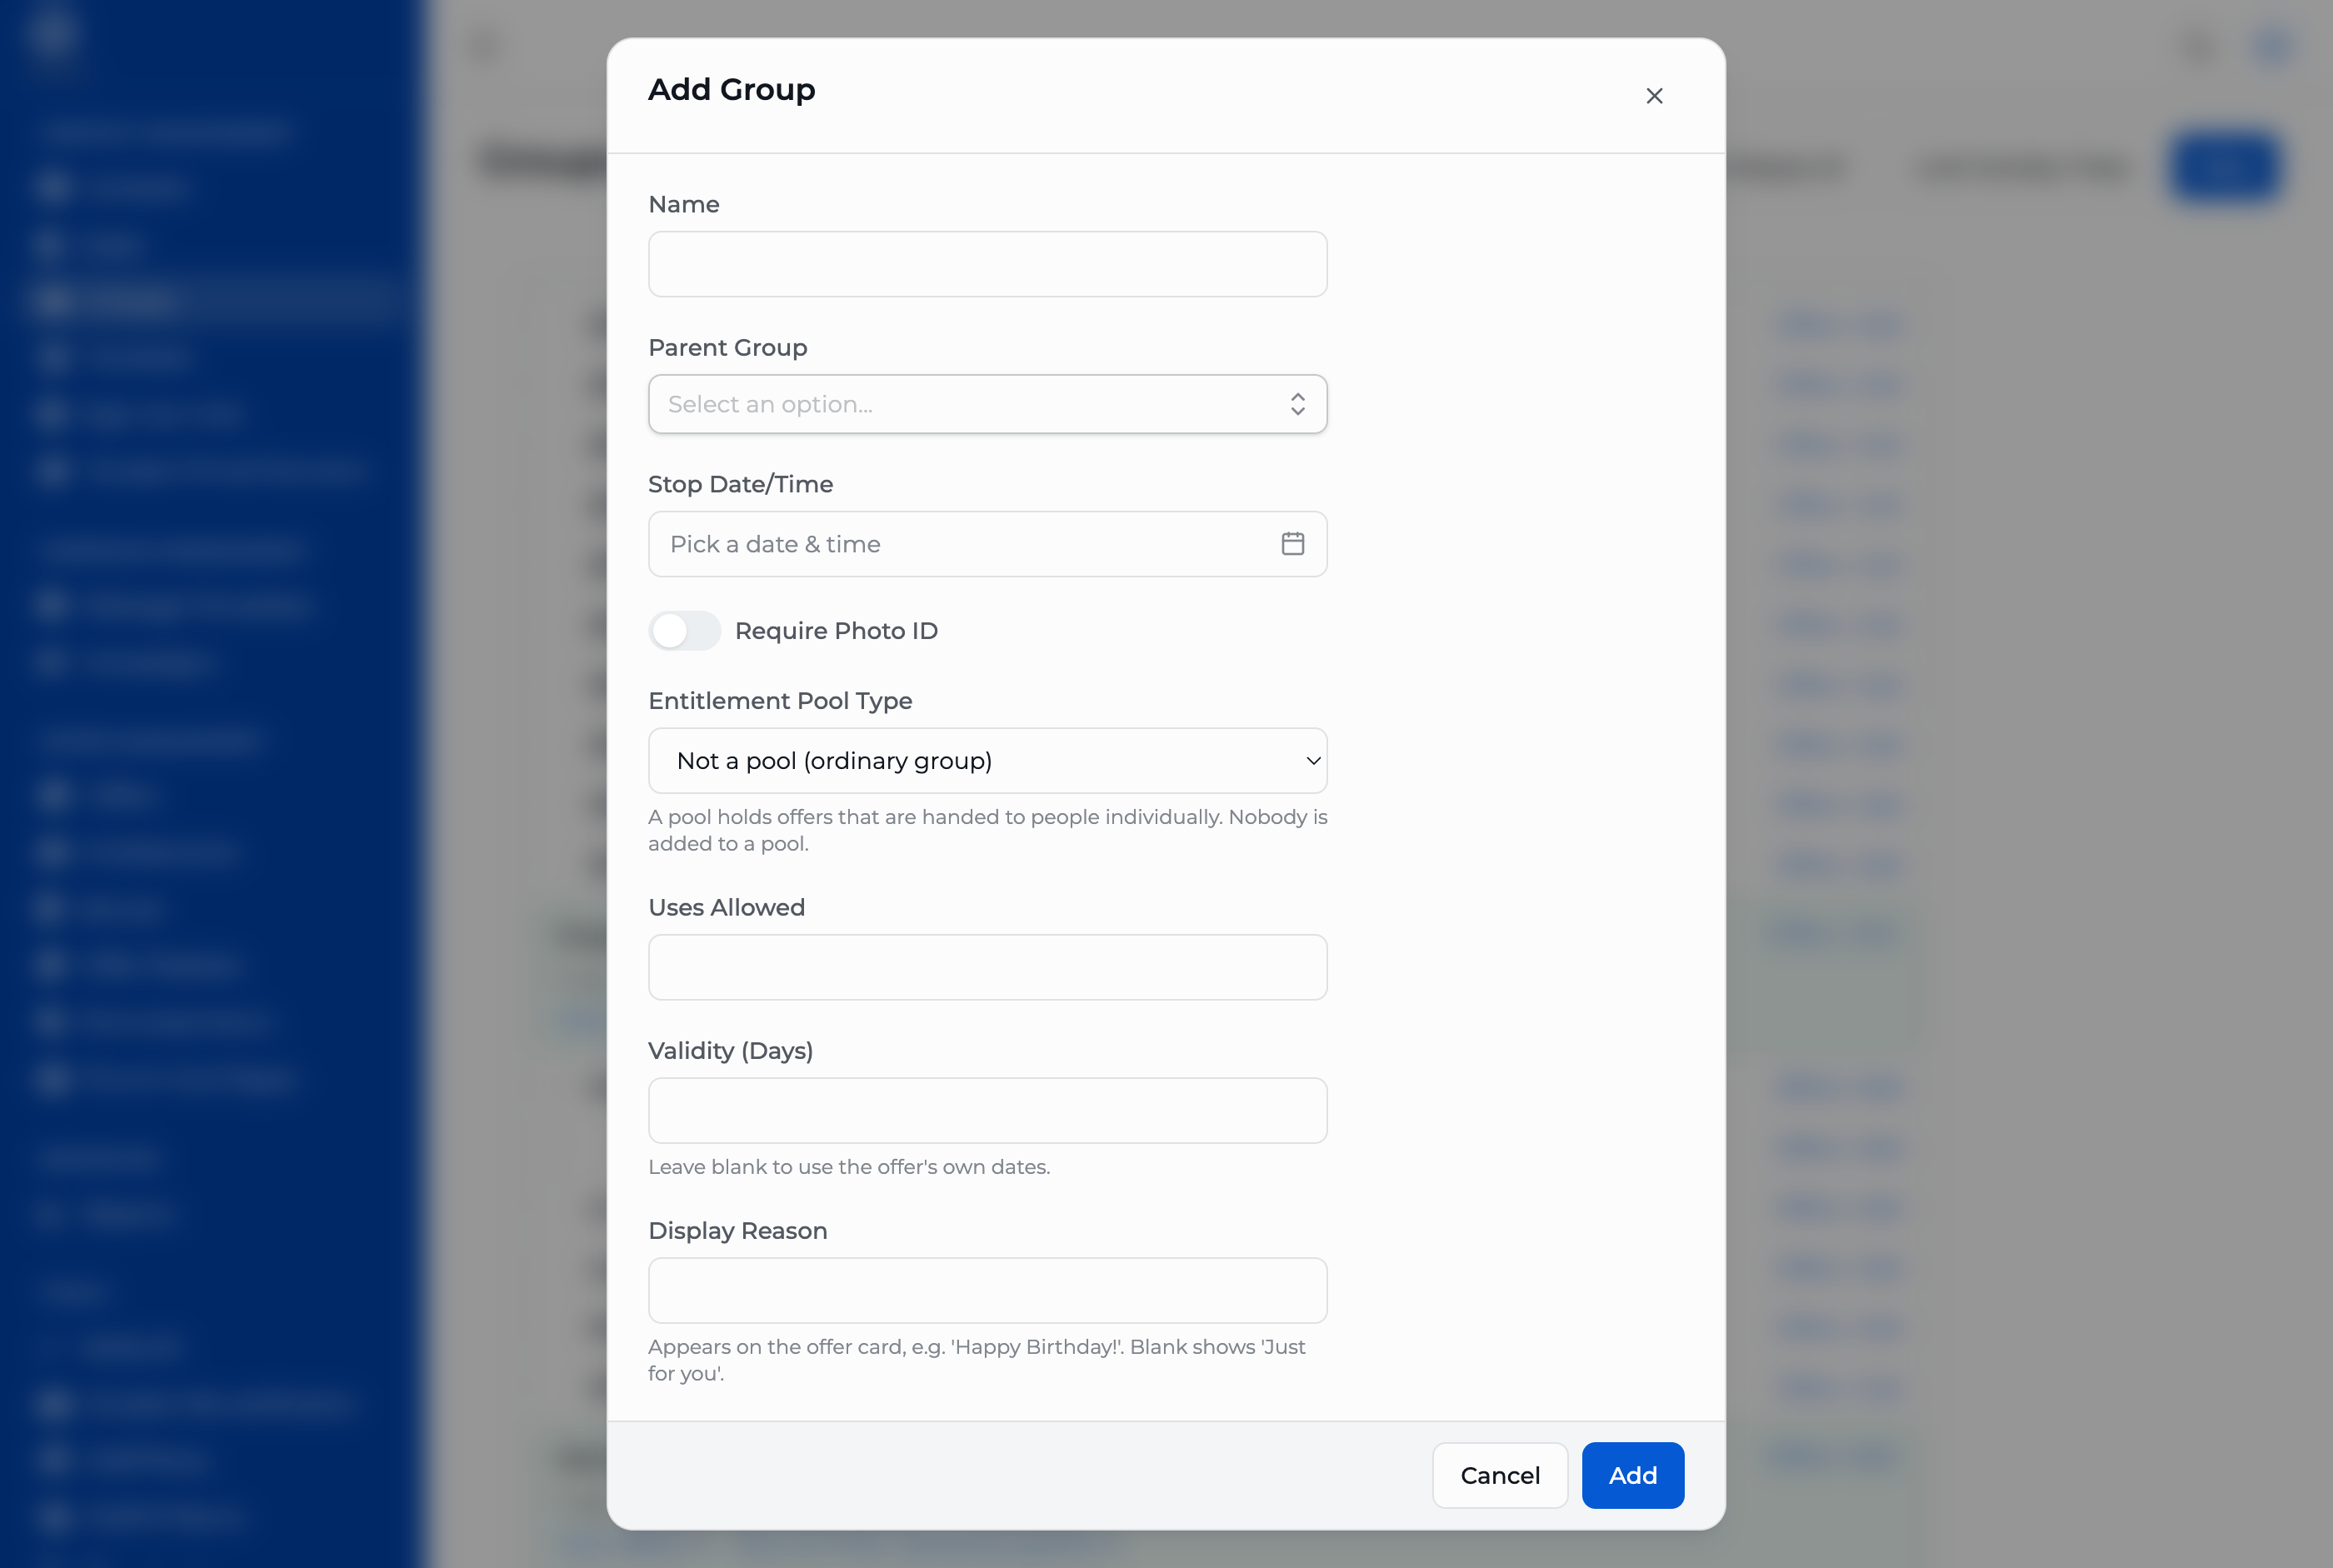
The group form. The same form is used to move a group, by changing its Parent Group.
The Parent Group picker already leaves out groups inside a locked society year tree, so you cannot pick one of those by accident. It does not leave out entitlement pools, though: choose one and save, and the CRM refuses it, because a pool has no members and anything parented beneath it would inherit its offers with no grant and no record of one (A4).
Moving a group
Open an existing group and change its Parent Group — there is no separate "move" action. The same rule applies as above: the new parent cannot be a pool, or sit beneath one.
The society year trees will refuse some edits.
You cannot rename a clone-managed group, move it, or add a group inside it. That shape is read back by the academic-year rollover, and a group added by hand either gets left behind at rollover or drags its members into the wrong year. Its stop date, photo-ID setting and entitlement settings all stay editable.
Stop dates
Every group carries a Stop Date/Time, editable even on a clone-managed group.
A stopped group disappears from this screen.
Once a group's stop date passes, it no longer appears anywhere in the Groups tree, the group search, or any group picker in the CRM — there is nowhere left here to open it, check it, or push the date back. Set it further out than you mean to stop using the group, not right up to the moment you want it gone.
For a society's year groups specifically, the academic-year clone sets this automatically at rollover, bringing an old year's stop date forward to match the new year starting — never pushing an earlier date back.
Hidden groups
Every group also carries a Hidden setting, but the group form here does not expose it — there is no box to tick to hide or unhide one. A hidden group is left out of the tree, the search and every group picker entirely. Hidden groups you will encounter today were created behind the scenes by another part of the system, not by an operator — the group backing a promo-code pool, for instance, is created hidden automatically. The one place a hidden group surfaces at all is indirectly: if a group you can see has a hidden parent, it is lifted to the top level of the tree and marked parent not shown, so it is not lost from view even though its real parent is not shown.
Reading the tree
The tree shipped a rework recently, worth knowing before you go looking for something in it:
- Root groups arrive expanded; everything below them starts folded. Expand all and Collapse all in the header override that for the whole tree at once.
- Searching matches on name and keeps every matched group's ancestors visible, so a hit shows up in context rather than as a bare name with nothing around it.
- Each group shows its own contact count, and, where it has children, a second count for everyone in its subtree.
- A group whose parent is hidden appears at the top level marked parent not shown (above).
The structure lock
CRM → Groups → Lock Society Trees (admin only). This is what turns an existing, hand-built society tree into a clone-managed one — for trees built before the lock existed, or as a one-off catch-up. It does not build anything; it only marks groups the clone would already recognise as belonging to a society's year structure.
- Open the dialog. It previews automatically, working out each tree's boundary by reading the group names in the estate.
- Read the count — how many groups it would lock, and how many are already locked.
- If any societies could not be placed, they are listed and left alone rather than guessed at.
- Press Lock N groups.
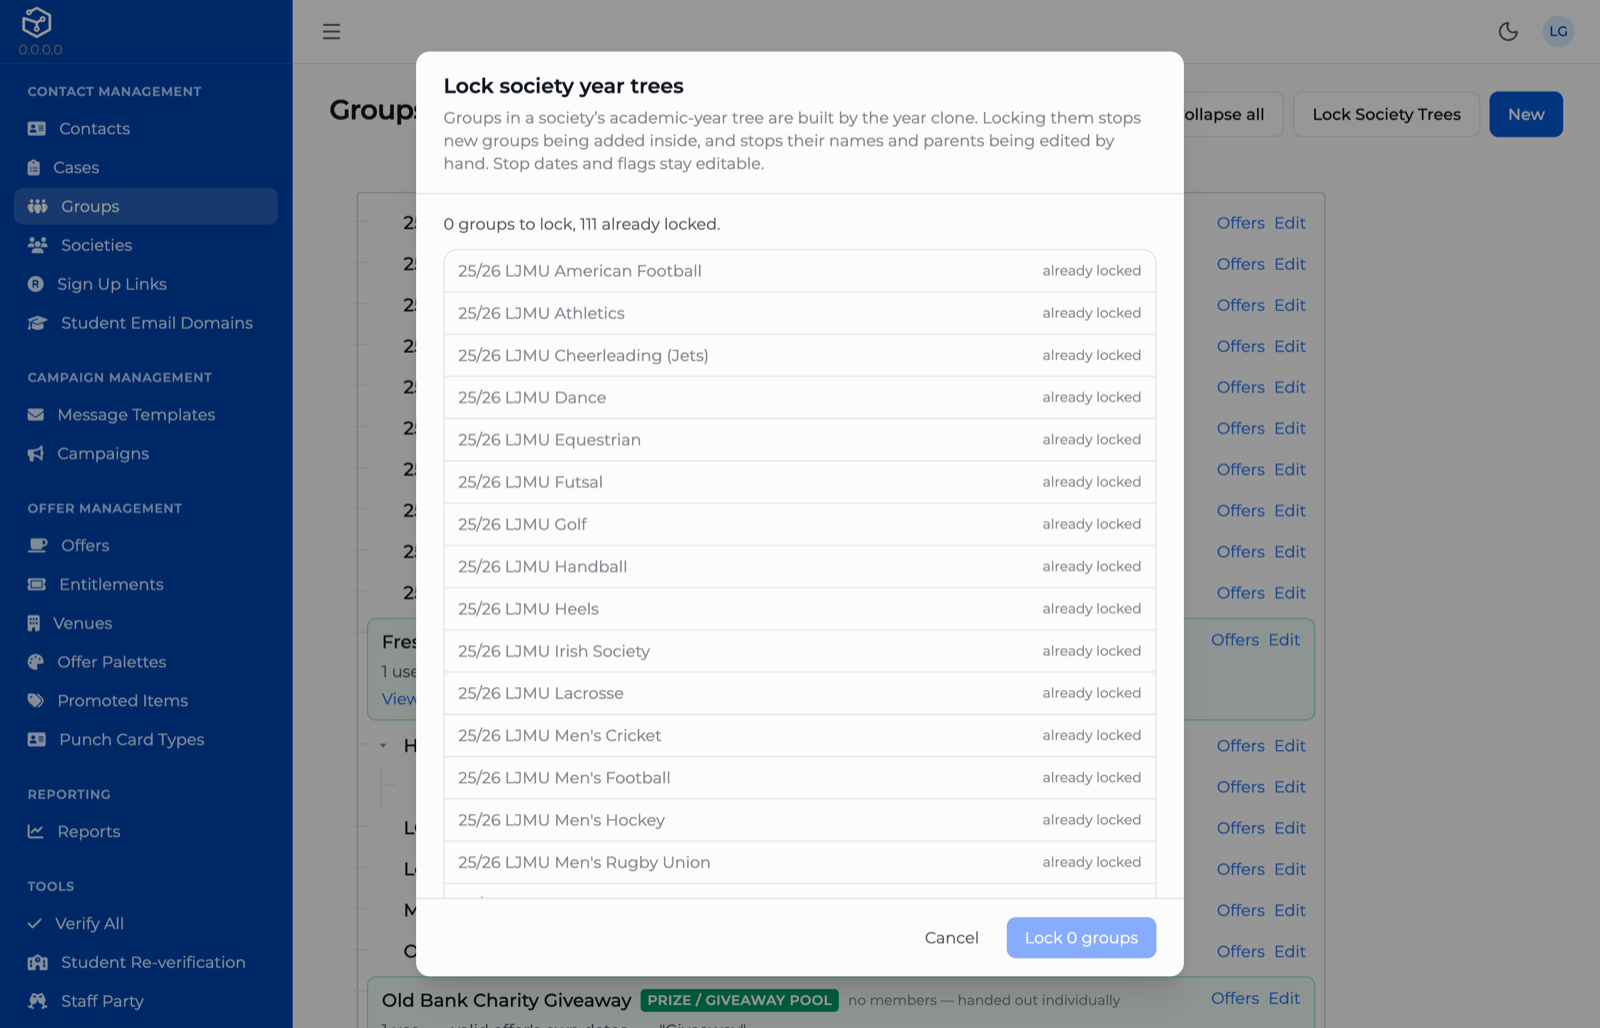
Previewing a structure lock before running it. Here every tree is locked already, so the count reads "0 groups to lock, 111 already locked" and the button offers nothing to do.
Because the boundary is derived from group names, this is the one operation here whose correctness depends on the estate being named the way the clone expects — worth reading the preview rather than pressing straight through it.
Part B · Entitlements and offers
B3 · Entitlement pools
A4 and A5 already cover what a pool is and what a grant carries. This chapter is the screens: creating a pool, what its four terms actually do, and granting one of its offers to a contact.
Creating a pool
Where to find it. CRM → Groups, same as B2. A pool starts life as an ordinary group; you turn it into a pool on the same form.
- Press New, give it a Name, and set Parent Group, Stop Date/Time and Require Photo ID as B2 describes — nothing about those fields differs for a pool.
- Set Entitlement Pool Type to one of the six types below. This is what makes it a pool. Leave it on "Not a pool (ordinary group)" and it stays an ordinary group with members, whatever you put in the other three fields.
- Fill in Uses Allowed, Validity (Days) and Display Reason — see the table below for what each one does.
- Save. All four fields need the
entitlement-group:editrole to set or change; without it the CRM shows them but locked, the same pattern B1 describes forcontact:edit.
| Field | What it does |
|---|---|
| Pool type | Which kind of entitlement this is: Manual, Birthday, Prize / giveaway, Campaign, Sign-up, or VIP. It labels the pool and is what the Entitlements page (below) and the pool's own "View all… grants" link filter by — it has no other effect on what a grant does. |
| Uses allowed | How many times each grant this pool issues can be redeemed. Every grant from this pool gets the same number; there is no per-contact override at grant time. |
| Validity (days) | How many days a grant stays live, counted from the moment it is granted. Leave it blank and the grant instead runs on the offer's own visibility window (A5) — useful when the pool should not outlive whatever campaign the offer itself is scheduled around. |
| Display reason | What the customer reads on the offer card, appended after "Just for you" exactly as A5 describes. Leave it blank and the card reads plainly "Just for you"; set it to "Happy Birthday!" and it reads "Just for you · Happy Birthday!". Do not write it as a standalone sentence — it is always read as the second half of that line. |
The offer's own Usage Limit is a separate, global cap.
A pool's Uses Allowed is per grant — how many times one contact's grant can be redeemed. The offer itself can also carry a Usage Limit, and for an offer held by a pool that number means something different: it is how many grants may ever be issued from that offer, added up across every contact. Set it too low for a Prize pool you mean to hand out widely and later grants fail outright once the cap is reached, with nothing on the pool card to say so — check the offer's own Usage Limit in CRM → Offers (B4) before relying on a pool to keep giving out the same offer indefinitely.
A4 already covers why a pool cannot hold children, and why nothing — pool or ordinary group — can be parented beneath one: the CRM refuses both edits outright. A pool itself can still sit under an ordinary parent in the tree; that is not the restriction.
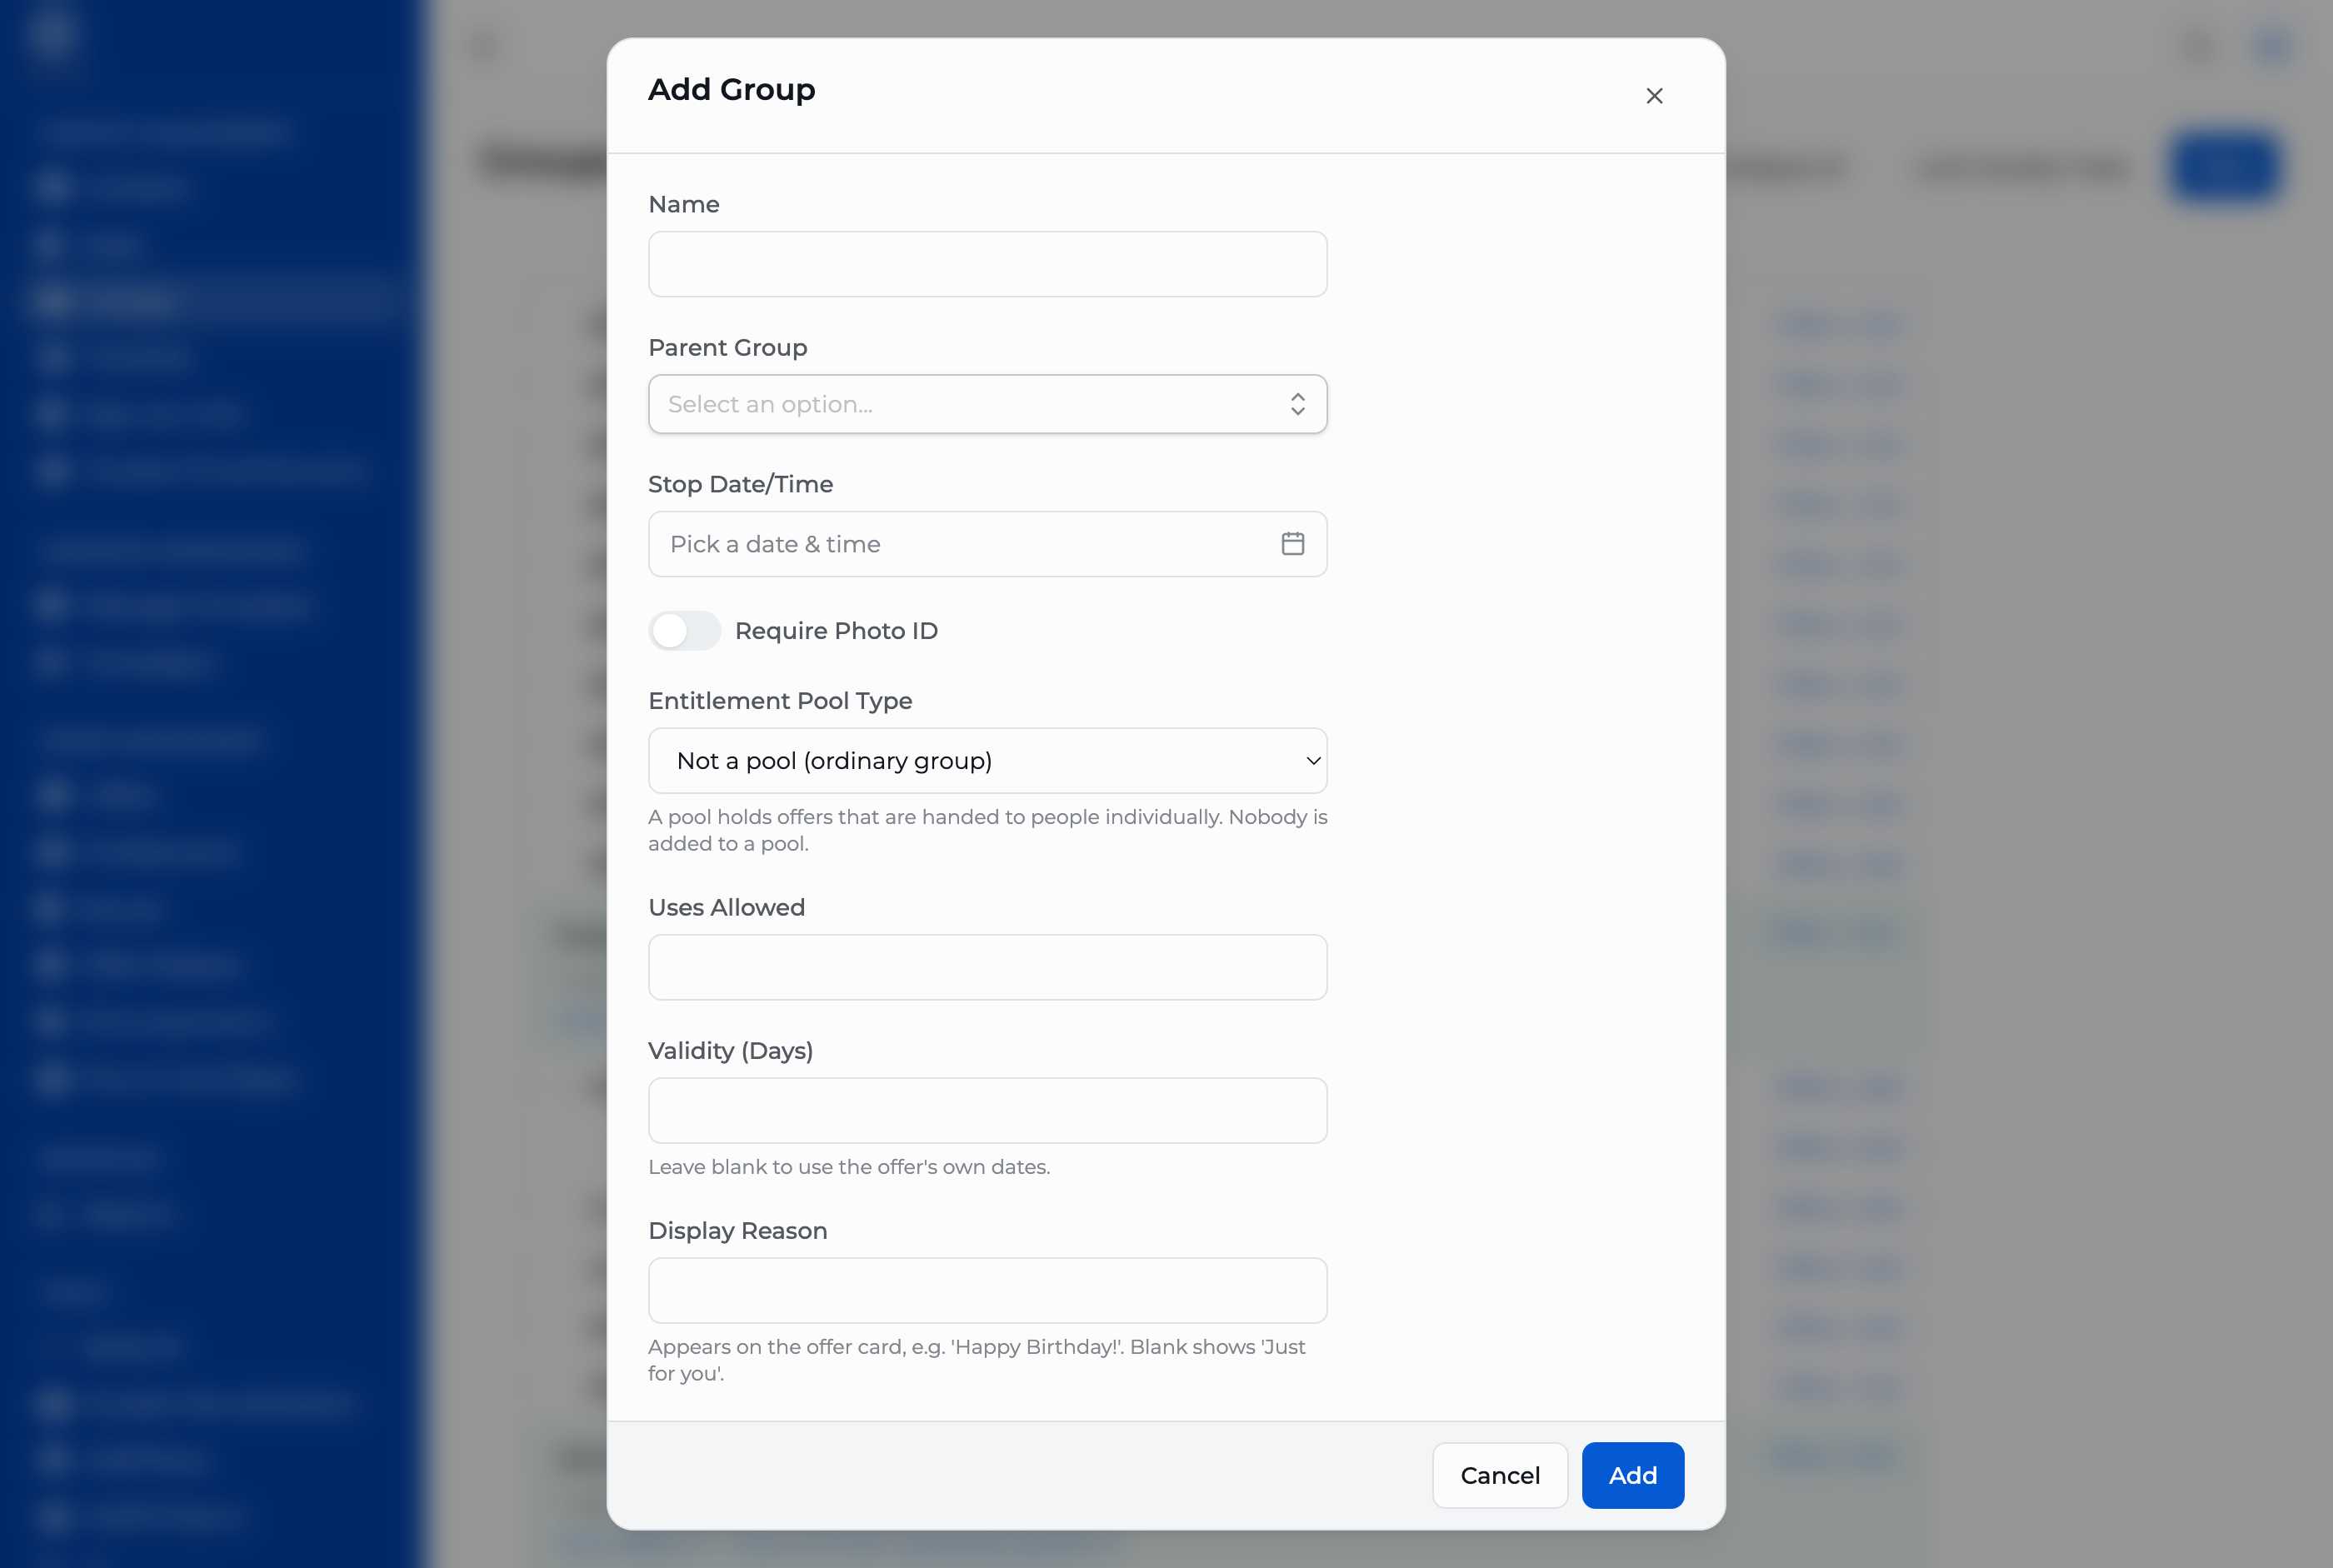
The entitlement fields on the group form. They only apply once a pool type is chosen.
Reading a pool in the tree
A group that is a pool is marked in the Groups tree with a coloured pill naming its type ("Manual pool", "Birthday pool", and so on) and the note "no members — handed out individually", so you do not mistake it for a group you could add someone to directly. Beneath that it shows its own terms at a glance — uses, validity, and the display reason exactly as they will read on the offer card — plus two links: View offers, the offers currently restricted to this pool, and View all… grants, every grant of that pool's type across the whole estate on the Entitlements page. That second link is by type, not by this one pool specifically — two Manual pools share the same destination, so if you run more than one pool of the same type, narrow further there by offer.
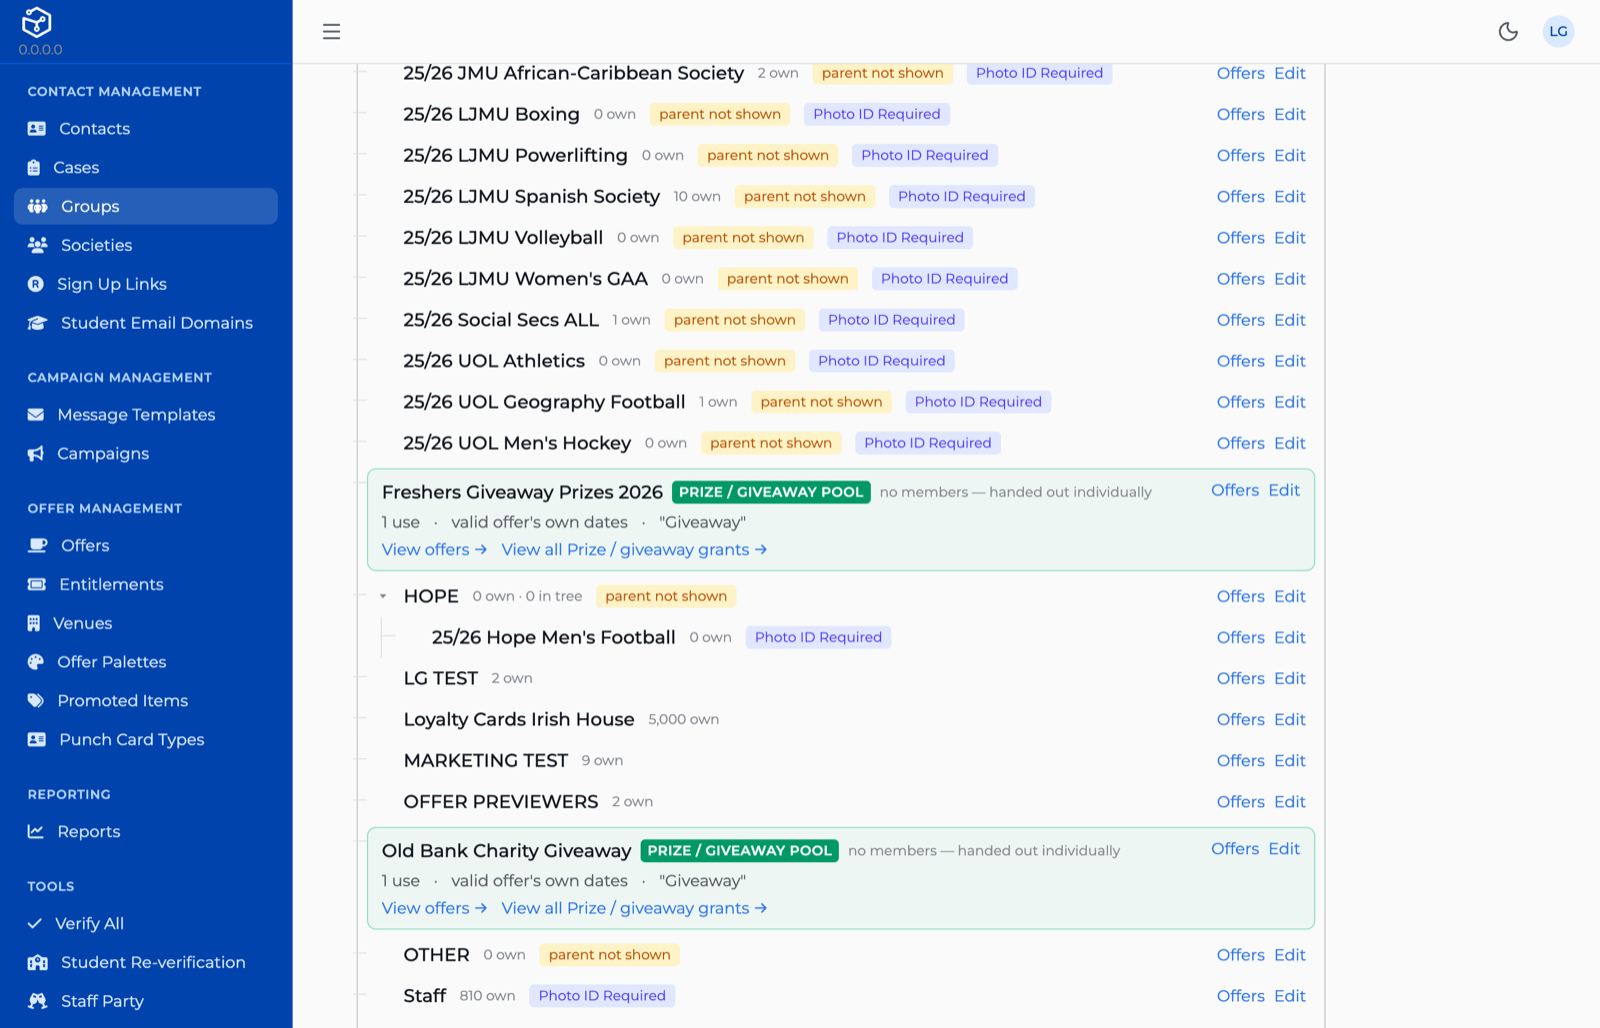
A pool, as it appears in the Groups tree. The ordinary groups above it count members — "2 own", "10 own" — while the pool says "no members — handed out individually".
Granting to a contact
Where to find it. Open the contact (B1) and go to its Entitlements tab. Grant an offer only appears if you hold the entitlement:grant role.
- Press Grant an offer.
- Choose the Pool.
- Choose the Offer. Only offers restricted to that pool are listed, and only if they are published and have not yet ended — an offer still in preview, or a finished one, is left out here rather than offered and then refused.
- Check What this pool hands over: uses, validity and display reason, read straight off the pool. None of the three is editable on the form itself — to change what a grant carries, edit the pool (above), not the grant.
- Press Grant.
A pool with no grantable offer cannot be granted from at all.
This is not a silent success. If a pool holds no offers, or holds only offers that are in preview or have already ended, its Offer field in the grant form has nothing to put in it — there is no offer to choose, and the form refuses to submit without one. Put at least one published, unended offer in the pool first. The one true silent-looking failure is different, and is caught wherever it is attempted from: granting a preview offer is refused outright, because it would otherwise list on the contact as an active grant while the customer holds nothing at all.
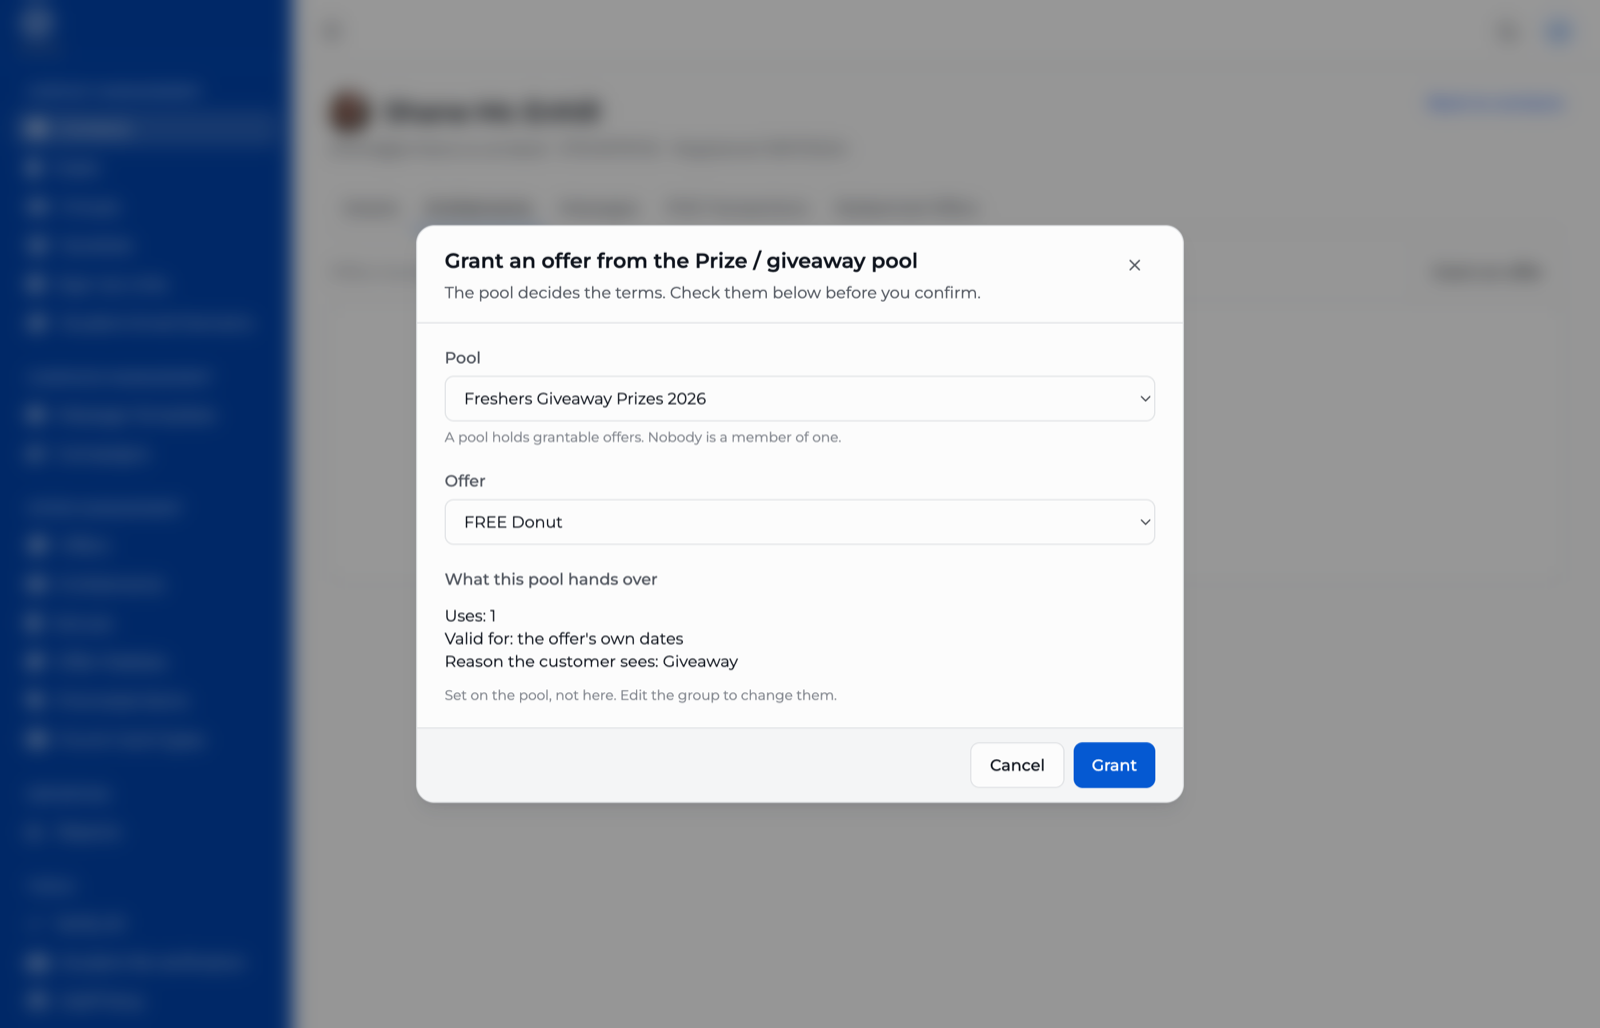
Granting an offer to a contact. The pool decides the terms; the form only asks which pool and which of its offers.
Once granted, the offer reaches that one contact by the third of A6's three routes — by grant, not by group — and the customer sees it on their offer card with "Just for you" and, if the pool set one, the display reason after it. Revoking a grant from the same tab takes it away immediately; there is no way to edit a grant's terms afterwards, only revoke it and grant again.
B4 · Offer management
Where to find it. CRM → Offers. A1 already covers where an offer comes from and what the import decides for it; this chapter is what you do with an offer once it exists here.
There is no New or Edit on this screen. That is consistent with A1, not an oversight: name, description, dates and restrictions all come from the deal in the POS and are rewritten by the import on its next run, so a change made here would only be overwritten five minutes later. This screen is for finding an offer and reading its state, not authoring one.
Searching and reading the list
Narrow the list by Venue, Group or Name. Two switches sit alongside them: Active Only, on by default, hides offers whose visibility window has already ended; Awaiting Sign-off Only, off by default, shows nothing but preview offers — the list this chapter's last section is built around.
Each row shows:
- Status. Blank for a published offer. An offer in preview carries an amber Awaiting sign-off pill, showing the state the import last set — nothing in the CRM changes it.
- Is Built. A green or red dot for whether the deal has a description yet. POS deals imported ahead of their launch, or ones nobody has finished writing copy for, show red here — paired with the Untitled deal placeholder name from A1 if nobody has named it either, this is what tells you which imported deal still needs marketing's attention before it is fit to show anyone.
- Groups. The groups the offer is restricted to, or Anyone if it carries none. See restrictions, below, for where these come from.
- Visible From / Visible To. The offer's visibility window (below), taken from the deal in the POS.
- Usage Limit and Is Public?, both set by the POS and read-only here.
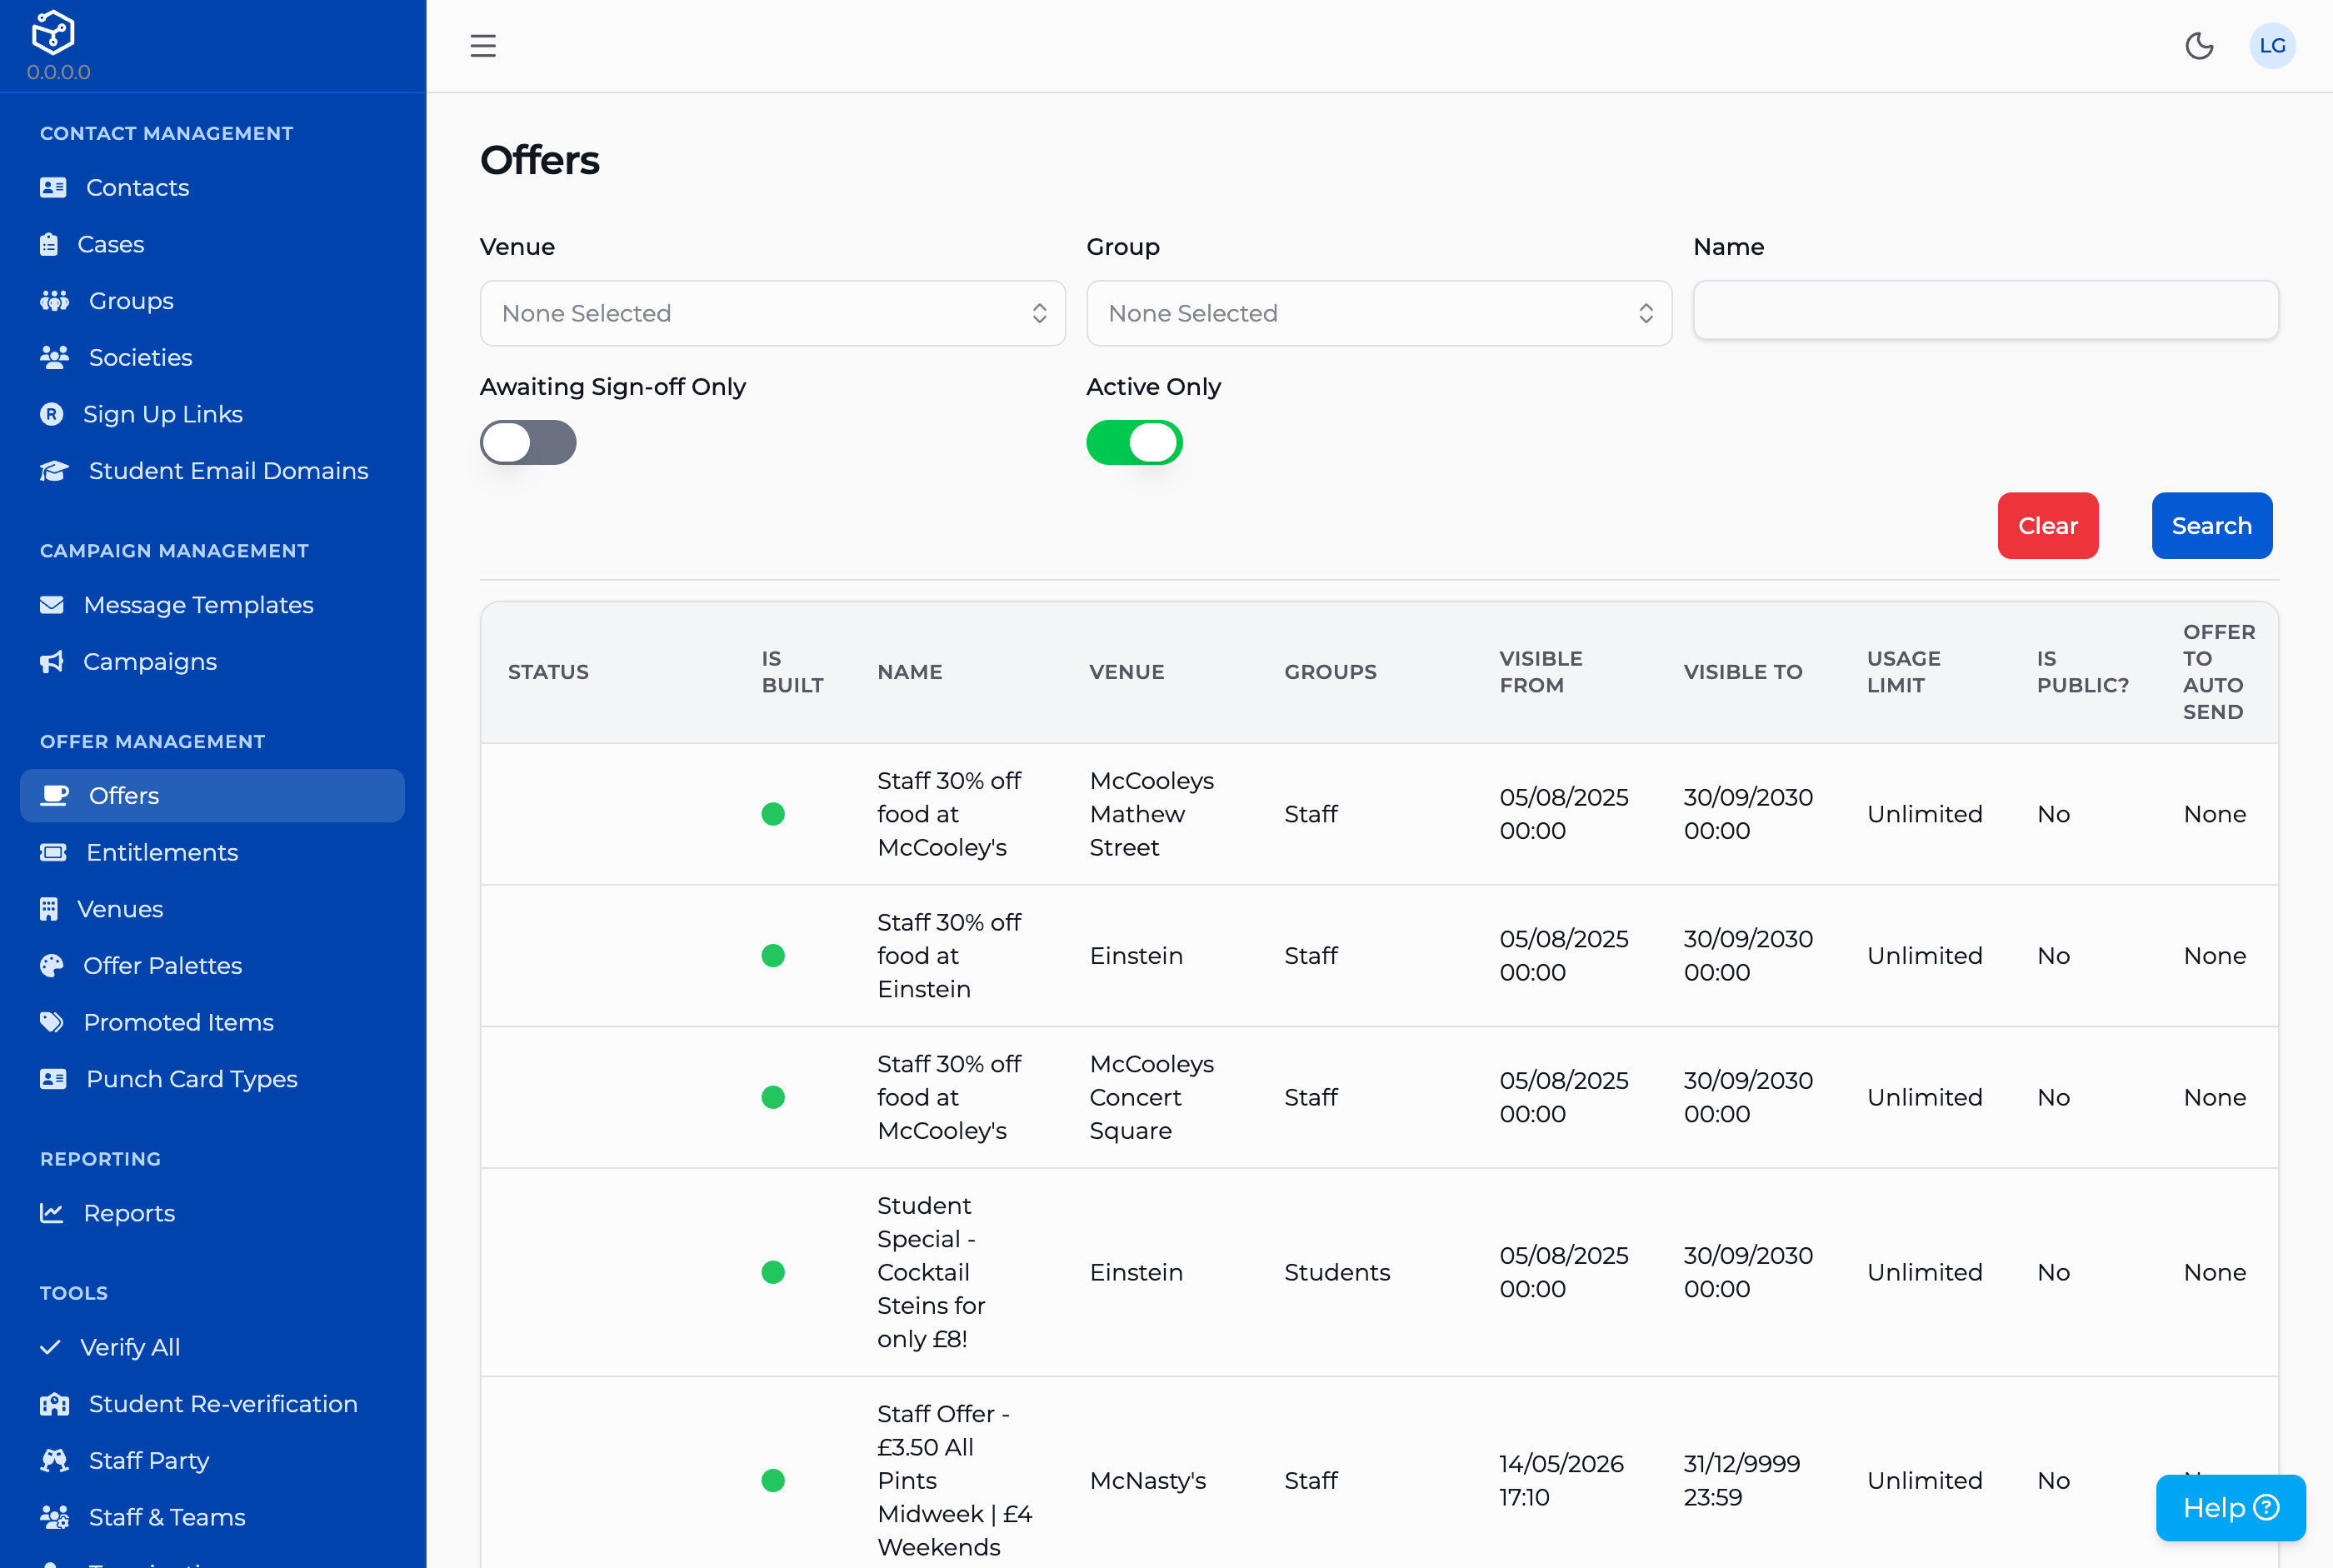
The Offers screen: search and status, not authoring.
The visibility window
Visible From and Visible To are the deal's own start and end times in the POS, carried straight across by the import and kept in step with it on every run — move a deal's end date in the POS and this list shows the new date within five minutes, not when someone edits it here. Two things follow from that, and both bit before: the window on its own says nothing about whether a customer can actually see the offer today — an offer still in preview stays hidden from customers whatever its dates say — and a window that has not yet started is deliberately not a barrier to a preview reviewer, which is the whole point of the section below.
Offer restrictions
The groups shown in an offer's Groups column are not chosen in the CRM. They come from the loyalty groups the POS has attached to the deal, re-read on every import run: a group added to the deal in the POS appears here on the next run, and one removed there disappears from here the same way. A4's rule about pools applies exactly as it does anywhere else — if one of those restriction groups happens to be configured as an entitlement pool, the offer becomes that pool's, reachable only by grant (B3), not by membership.
A restriction group has to exist in the CRM already, or it is silently dropped.
The import matches each loyalty group id the POS sends against the CRM's own group ids and only keeps the ones that match. A loyalty group set on the deal in the POS that does not correspond to any group id in the CRM — a typo, a group deleted since, an id from the wrong environment — is left off the offer with nothing logged to say so. If a deal in the POS carries a restriction that never shows up here, check that the group id actually exists in the CRM before assuming the deal itself is wrong.
Signing off a preview offer
A6 already describes the exception: a preview reviewer sees every preview offer that has not yet ended, from the moment it is imported, regardless of group or grant — the whole estate's pending deals at once, with no horizon on how far ahead they were built. This is how that gets used.
Who counts as a reviewer is not a CRM screen. It is one group id, configured per environment for the customer app — and for the mobile app too, if reviewers use that — and it only takes effect once the app has been restarted. Day to day that is already done for you; what you actually do is:
- Add the person to that reviewer group the same way as any other group membership (B1). If you do not know which group that environment uses as its reviewer group, ask engineering — it is not named or marked as such anywhere in the CRM itself.
- In CRM → Offers, switch on Awaiting Sign-off Only to see everything currently waiting, and use Is Built to spot the ones nobody has finished writing copy for yet.
- Have the reviewer open the app signed in as themselves. A preview offer renders exactly like a live one there — no badge marks it out, so what they see is genuinely what a customer would see once it goes live.
- Sign-off itself is not a button anywhere in the CRM. The reviewer's approval is ticking Publish to App on the deal in the POS. The next import clears the preview state on that same offer, and it is live.
A reviewer who takes a preview deal to the bar will find it does not work there.
A preview deal is switched on nowhere in the POS, till included, so it will not be honoured at the till even though the reviewer can see it in the app. That is deliberate — it is what stops an unsigned-off deal being redeemed by accident — but it reads as a bug unless the reviewer already knows to expect it.
Part C · Reporting
What you can find out, and where to get it.
C1 · What reports exist
Where to find it. CRM → Reporting → Reports. Unlike every other area in this guide, Reporting has exactly one entry in the CRM's own menu. There is no separate menu item per report — every report in this chapter is reached by opening Reports first and choosing a card.
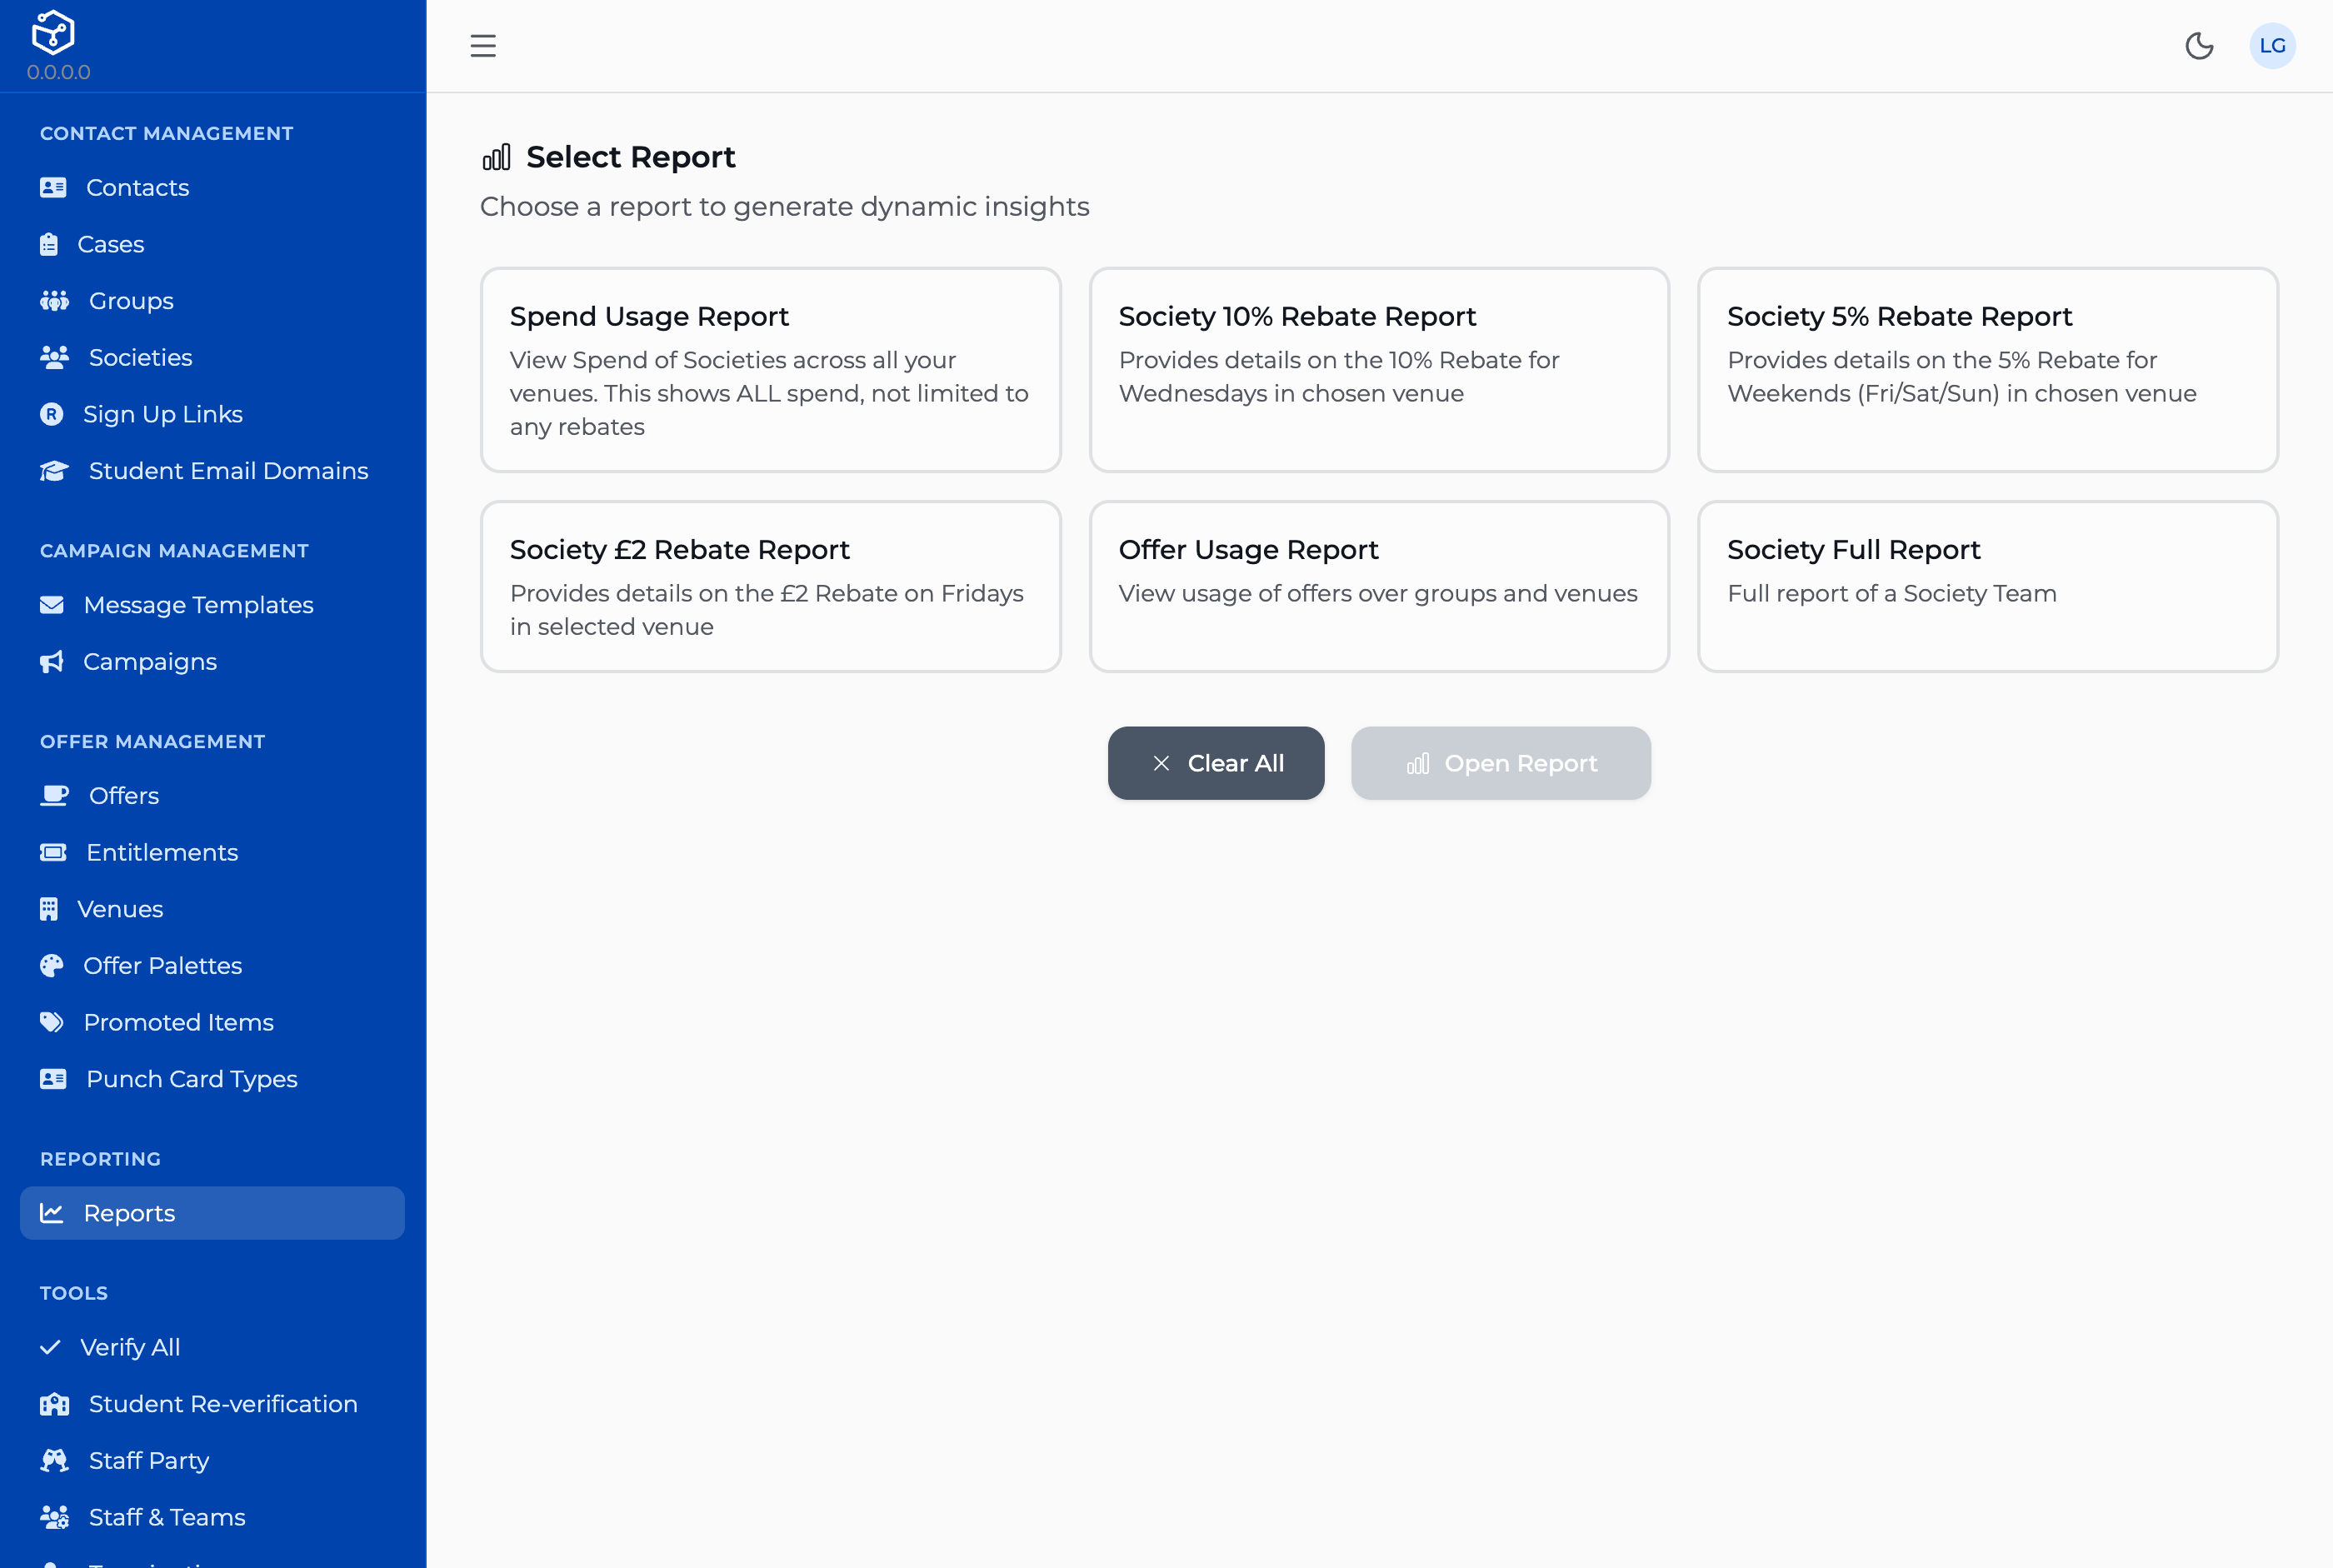
The Reports screen. Every report in this chapter starts here.
The cards on this screen are not all the same kind of thing, and the difference matters for what you can expect from each:
- A query report runs in place. Fill in its parameters, press Execute Report, and the results appear below as a plain table — no drill-down, no grouping. If you hold a role the CRM treats as an admin role, an Export CSV button appears once there are results; without it, the table is all you get. Query reports are not written or edited from the CRM. Engineering sets each one up directly, so if you need a new one, that is a request to them, not a screen here.
- Everything else on this screen is a card that simply opens one of a small number of dedicated report screens, listed below. Pressing it says Open Report, not Execute Report, and takes you to a full page rather than showing a result inline.
Which cards you see at all is also decided per report: each one can carry its own extra role restriction, and a report you lack the role for is left off the list entirely — it does not appear locked, the way a field you cannot edit still shows on a form elsewhere in this guide (B1, B3). If a report you expect is missing, that is as likely to be a role gap as anything else.
The dedicated report screens
| Report | What it shows |
|---|---|
| Offer Usage Report | Redeemed offers, broken down group → venue → day → contact. Optionally narrow to one group (C2). Each contact shows every group they belong to on hover, and each redemption links to its till transaction. |
| Spend Usage Report | The same breakdown, but for all spend at the till, not only offer redemptions — group → venue → day → contact → transaction. |
| Society Rebate Report | The 10% Core Sponsorship rebate, for one or more team-and-venue pairs you choose by hand. Counts Wednesdays only — a transaction on any other day of the week is left out of the total, whatever date range you set. |
| Society Weekend Rebate Report | A 5% rebate, Friday through Sunday only, at a fixed list of venues rather than ones chosen on the form. |
| Society Friday Fixed Rebate Report | A flat £2 per scanned contact, Fridays only, again at fixed venues. |
| Combined Team Report | See C3. |
Holding the Reporting role gets you the card, not necessarily a result.
The Reports screen itself, and any query report on it, only need the Reporting role (or Admin). Every dedicated report screen in the table above — Offer Usage, Spend Usage, every society rebate report, and Combined Team Report — sits behind a stricter check: Admin, or the account type the CRM calls an Ops Manager. Someone holding only the Reporting role can open any of these cards, but running the report will fail. If a report screen looks right but nothing happens when you run it, check which of the two role checks the person is missing before assuming the screen is broken.
What that failure looks like is not a permissions message. Every one of these six screens shows the same "Failed to execute report" message whatever actually went wrong, so a refusal on grounds of permission reads no differently from any other failure. If someone with only the Reporting role reports a report that "just doesn't work," ask what role they hold before you go looking for a bug in the report itself.
A used-offers report and a bulk send-offer action for it are built but switched off — there is no route to either of them anywhere in the CRM today, under Reporting or otherwise. If you have seen either described elsewhere, treat that as out of date.
C2 · Group and hierarchical reporting
A3 established that group membership is read upward: a contact counts as a member of every ancestor of whatever group they were actually added to. Offer Usage Report and Spend Usage Report follow that same rule when you narrow them to a group — checked directly, not assumed from a document. Choose a group and the report includes that group and everything beneath it, so a contact added directly to a subgroup several levels down still shows up when you filter by the group at the top. Practically, this means you rarely need to run these reports once per subgroup: filtering by the top of a tree already rolls up everyone under it.
Offer Usage Report / Spend Usage Report, filtered to "Students":

  Students ─────────────── counted
     │
     ├── Freshers 2026 ──── counted
     │
     └── Societies ───────── counted
            │
            └── Chess Soc ── counted (added here directly, rolls up to Students)
Selecting a group in these two reports pulls in every group beneath it — the same practical result as A3’s upward walk, reached by expanding downward from the group you picked.
The society rebate reports do not follow this rule.
Society Rebate Report, Society Weekend Rebate Report, Society Friday Fixed Rebate Report — and, through them, the rebate figures in the Combined Team Report (C3) — count only contacts added directly to the exact team group you pick. They do not expand downward the way Offer Usage and Spend Usage do. If a team's membership is split across subgroups underneath it, only the contacts added to the named team itself are counted; everyone added lower down is silently left out of the rebate, with nothing on the report to say so. This is a real difference between report types in the same screen, not a guess — check where a team's members were actually added before trusting a rebate total that looks low.
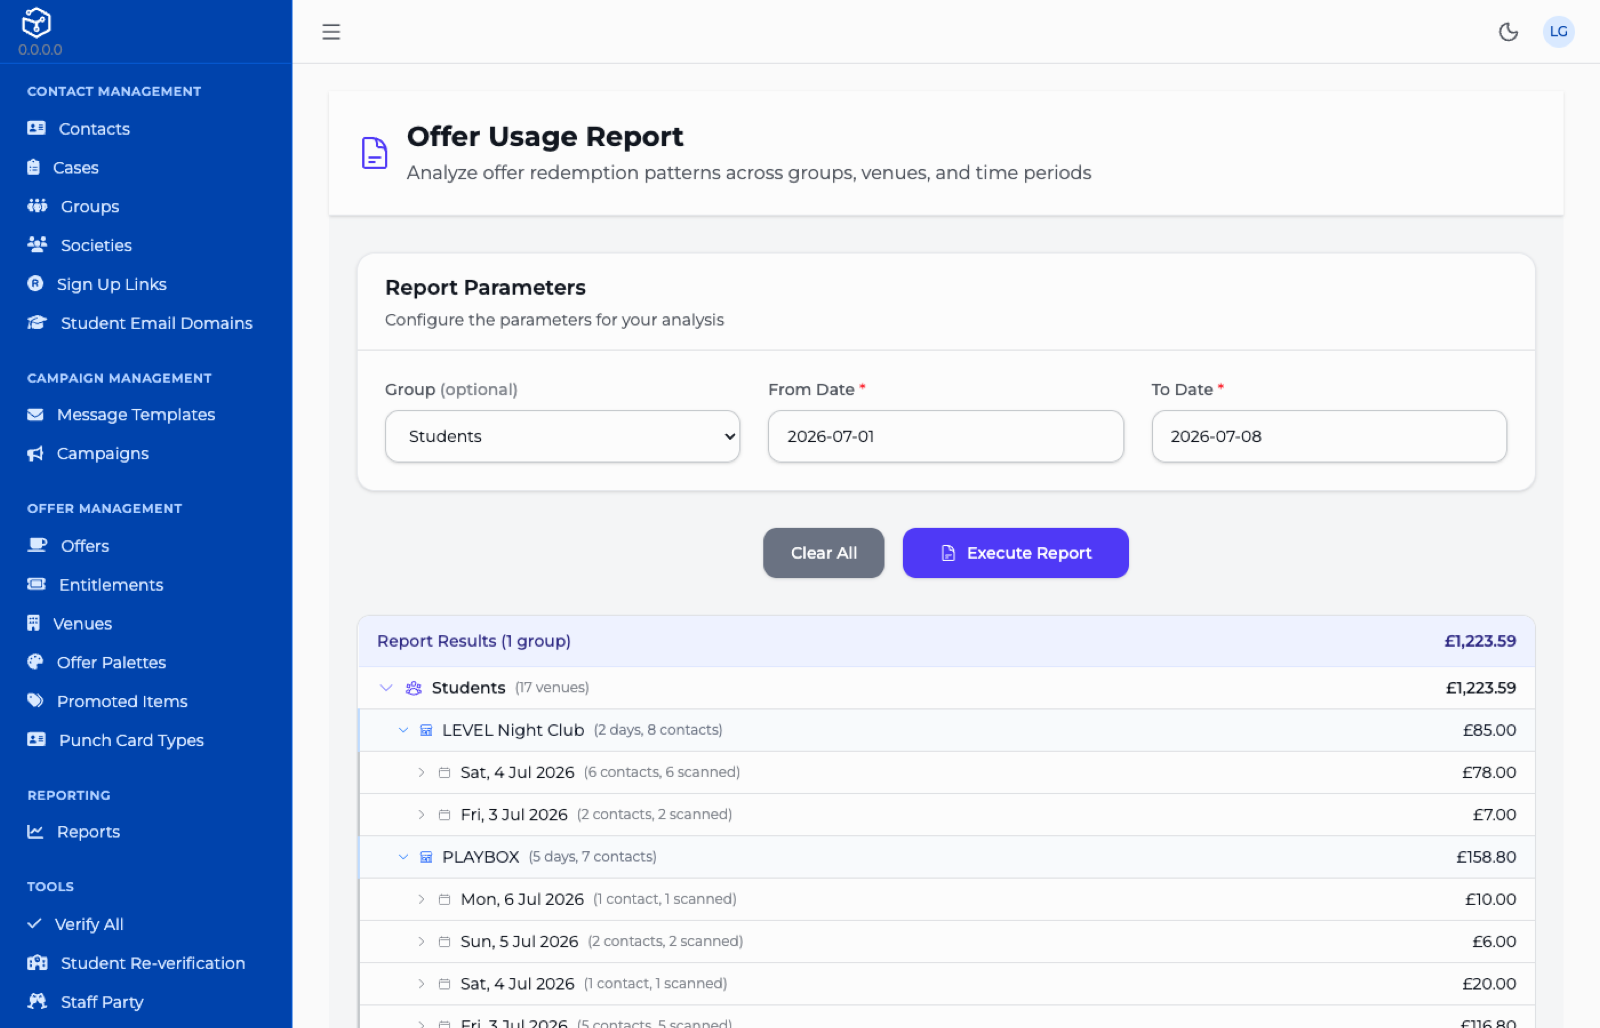
A usage report narrowed to one group, showing the group → venue → day → contact drill-down. Each level carries its own total, and the group total at the top is the sum of the venues beneath it. Opening a day one level further lists the individual contacts.
C3 · The combined team report
This one is a genuine screen, whatever an older document may have said — CRM → Reporting → Reports, opened from its own card same as any other dedicated report.
It runs in one of two modes:
- Society mode. Pick a society from the dropdown and its home venues and scheduled visits are used automatically — you only need to set the date range.
-
Manual mode. Pick a team, tick one or more venues as Core Sponsorship venues, and optionally add specific venue-and-date pairs as Additional Visits/Pre's.
-
Choose a society, or leave it blank and configure a team manually.
- Set the date range.
- In manual mode, tick Core venues and/or add Additional venue-date pairs.
- Press Generate Report to see it on screen, or Download PDF for a printable copy.
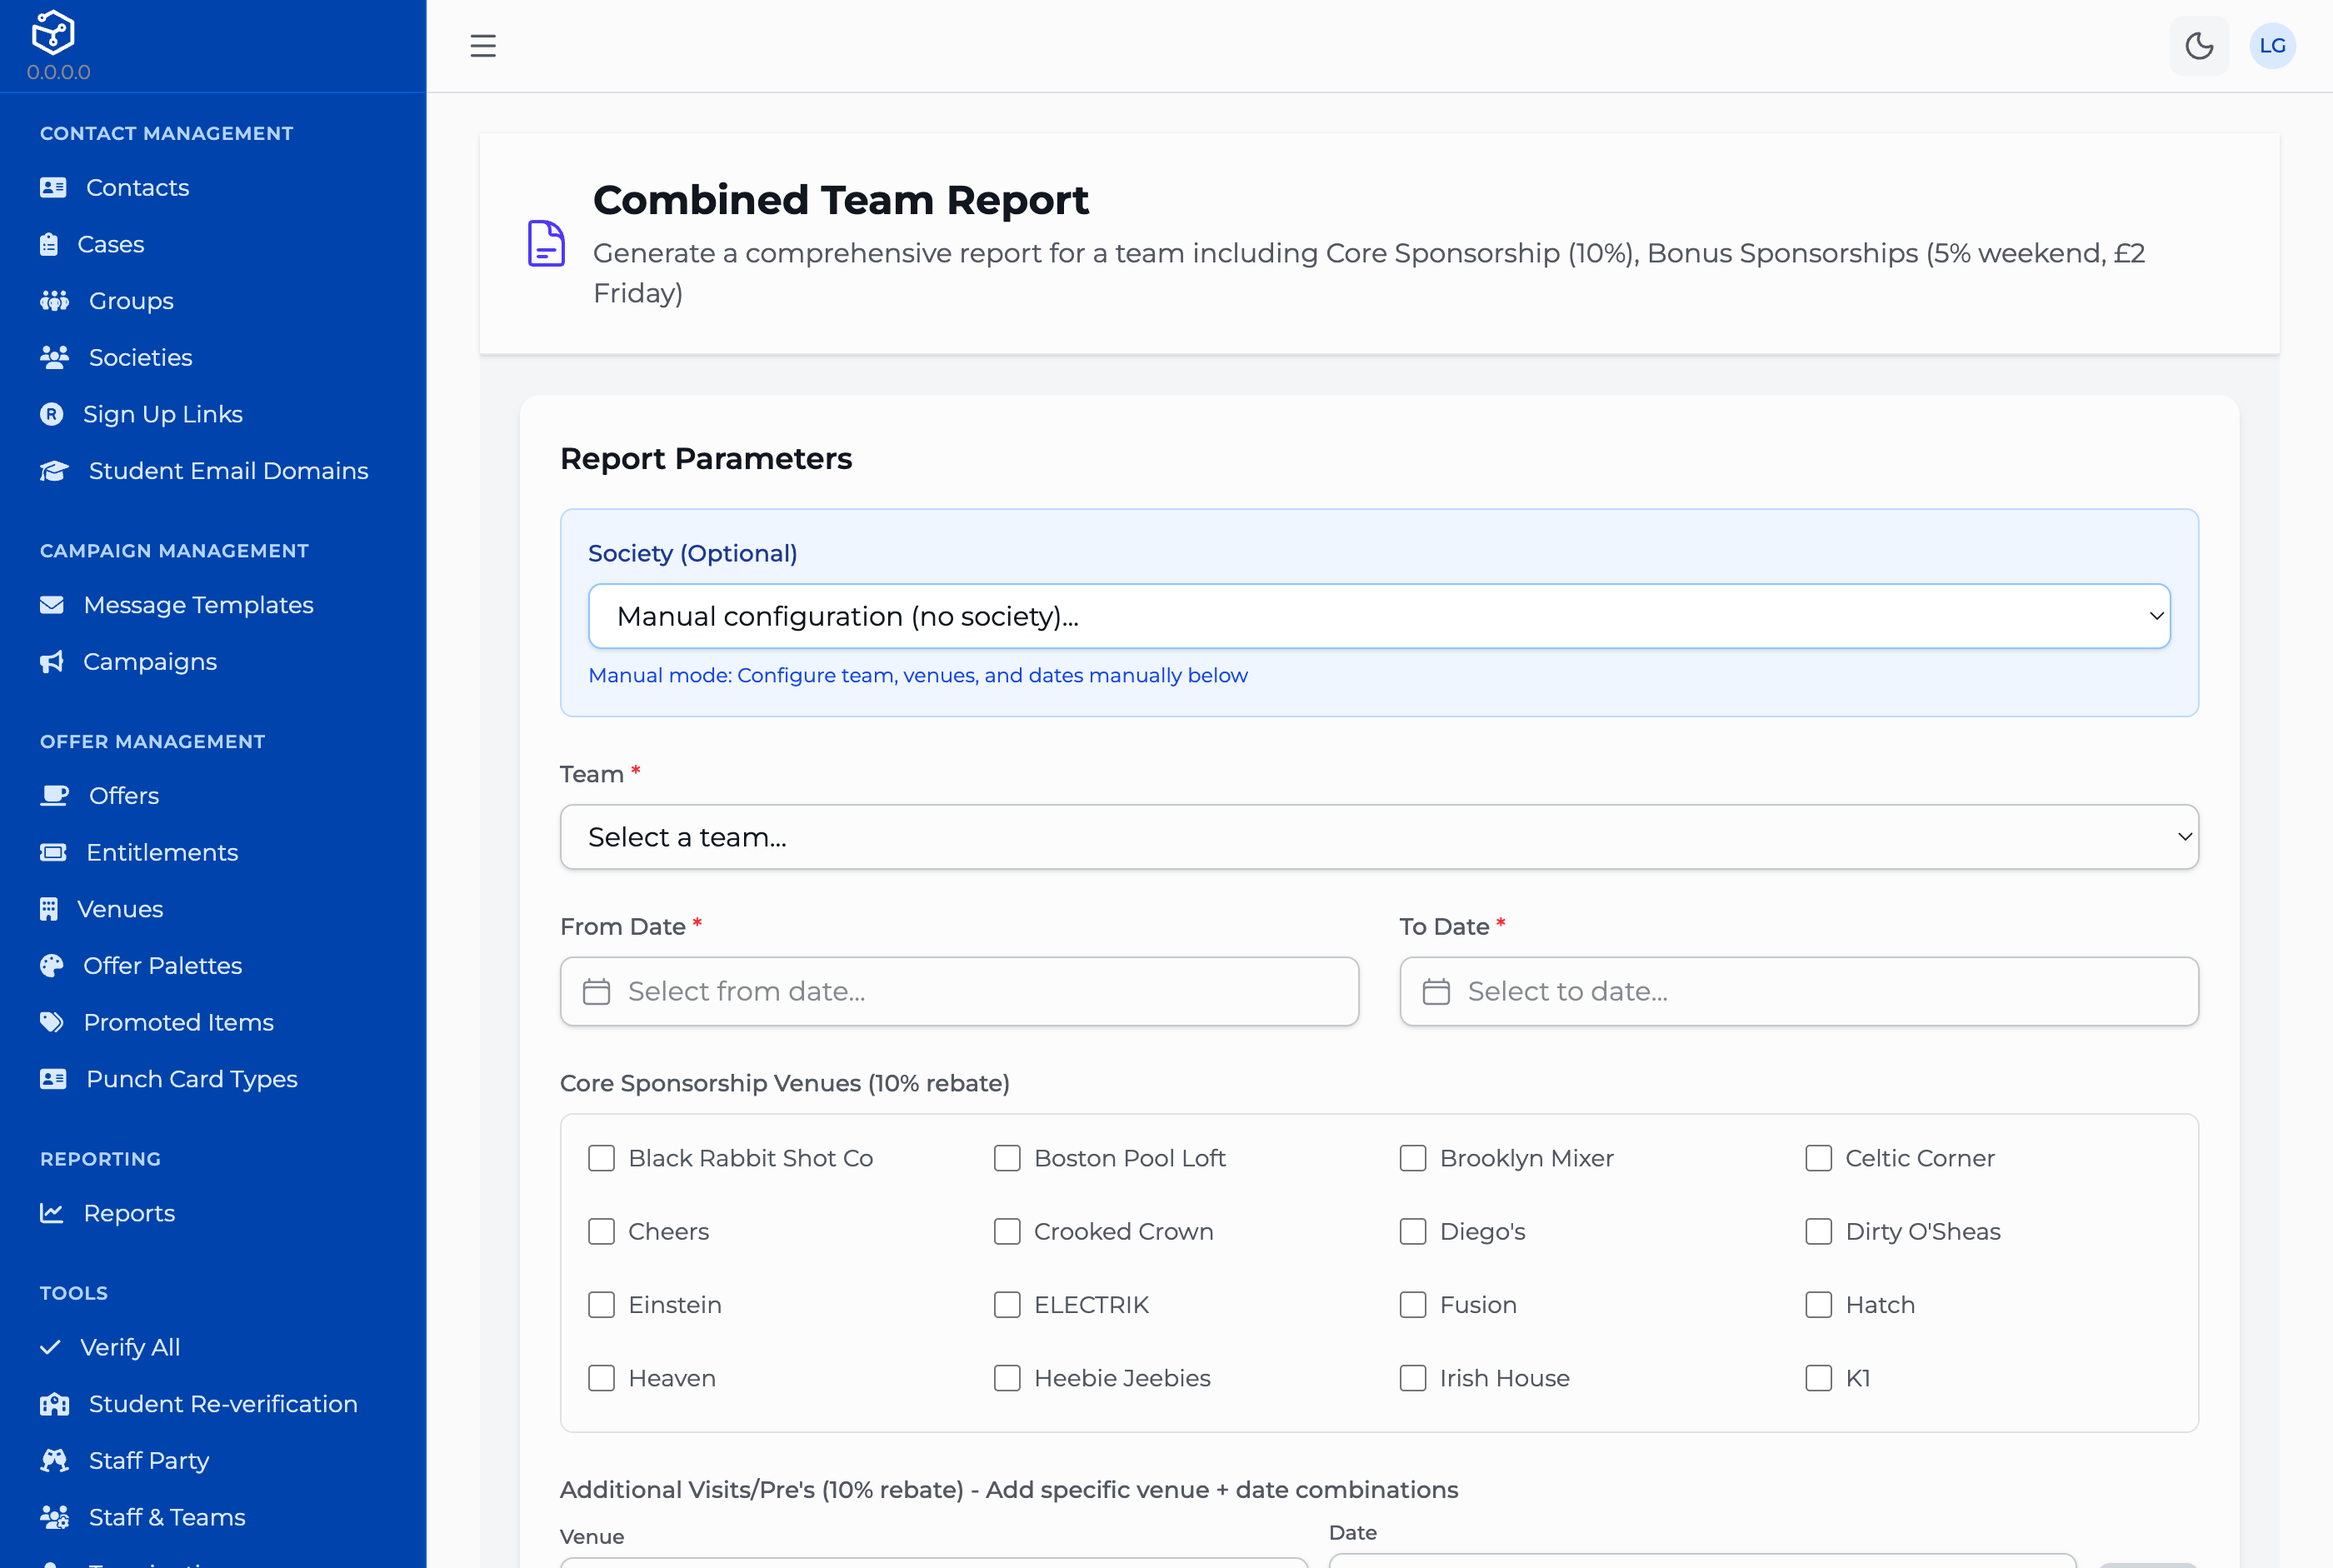
Configuring a Combined Team Report by hand, rather than from a society.
Whichever mode you use, the report always computes the same four rebate categories: Core Sponsorship and Additional Visits (both 10%, from the venues and dates you set), and Bonus Sponsorships — Weekend (5%) and Friday Fixed (£2) — which run automatically against a fixed list of venues, not anything chosen on this form. You cannot add or remove the Weekend and Friday categories; they are always included.
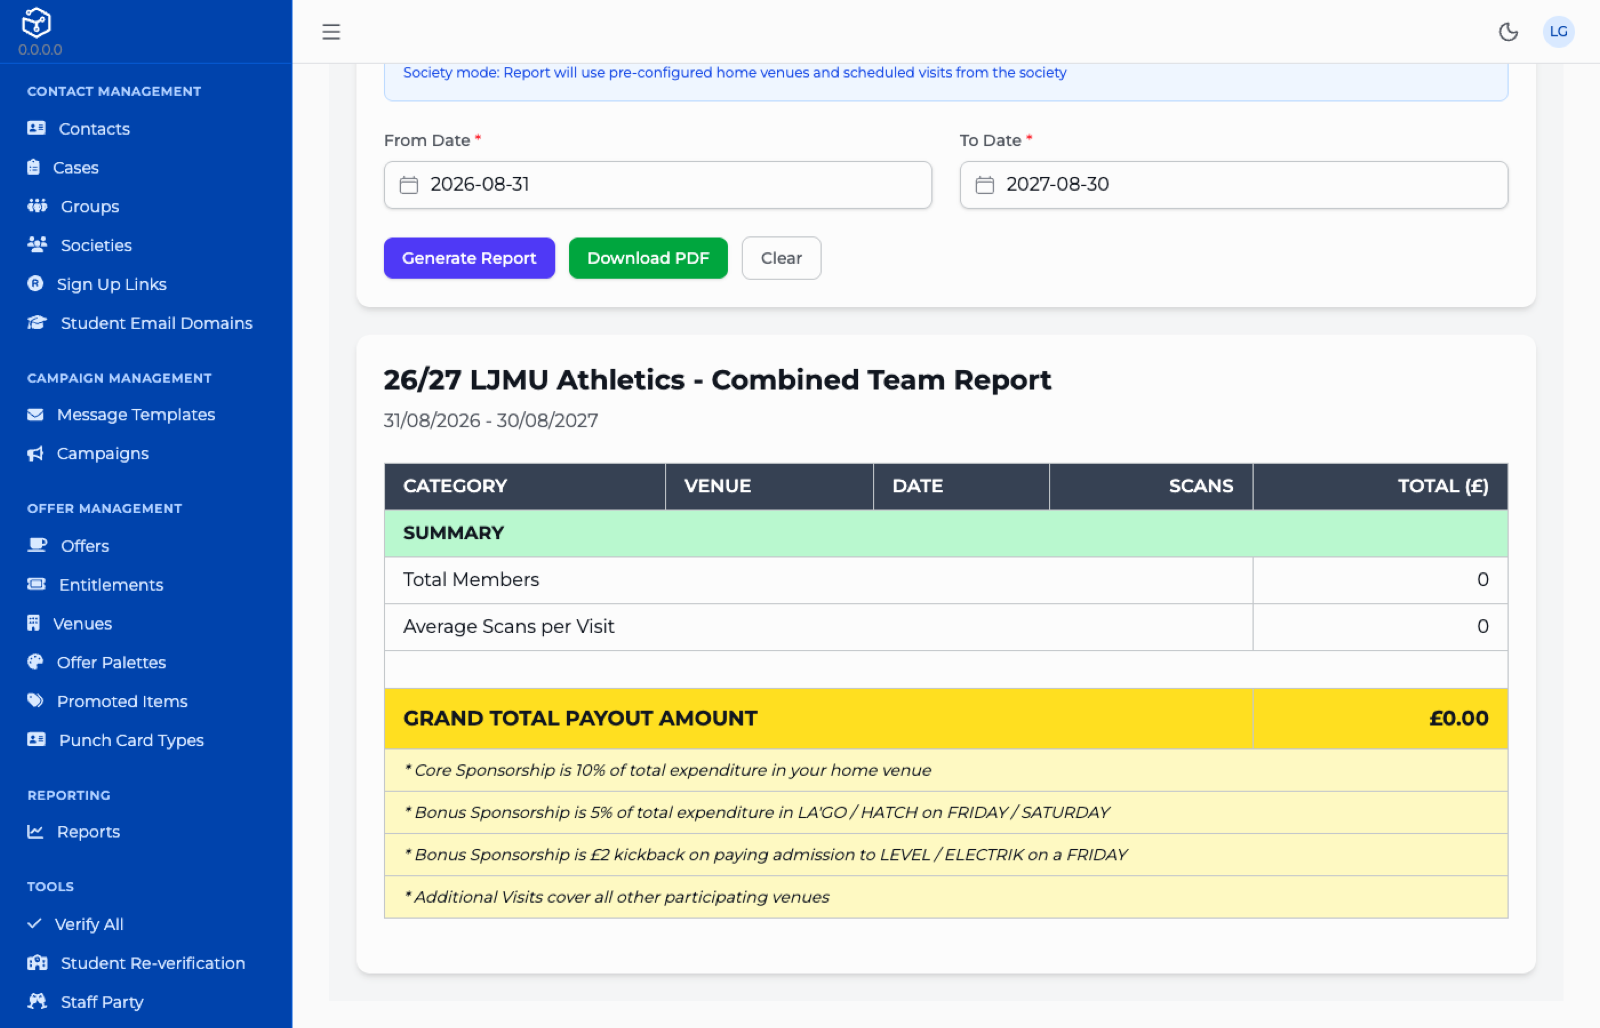
What Generate Report produces: venue detail, then subtotals by category, then a single grand total across all four categories. This example was run for a team with no members over a future date range, so it has no detail rows — it is here to show the shape of the output and the four sponsorship rules printed beneath it, not a realistic result. A team with activity fills the space between the column headings and SUMMARY.
Only rebate totals, not usage detail.
This screen produces sponsorship rebate figures only — Core, Additional, Weekend, Friday Fixed. It never includes an Offer Usage or Spend Usage breakdown, whatever else you may have read about this report combining them. If you need the detail behind a rebate, run Offer Usage Report or Spend Usage Report separately (C1), filtered to the same team and date range.
An Additional Visit on the wrong day contributes nothing.
Core Sponsorship and Additional Visits both run through the same Wednesday-only rule C1 describes for the standalone Society Rebate Report. Add an Additional Visit for a Friday or a Saturday and it is accepted onto the form without complaint — but no transaction from that day counts toward the total, because the report underneath only ever counts Wednesdays. The visit simply does not show up in the result; nothing here tells you it was dropped.
To confirm before this guide is circulated.
The two points below depend on how a particular environment has been set up, so they could not be checked from the system itself — someone who actually uses these reports needs to check them against a live environment: whether the Offer Usage, Spend Usage, society rebate and Combined Team Report cards actually appear in your Reports catalogue today (which cards appear is set up in each environment's own data, not by anything this guide can inspect); and the exact wording of each report's card and description as it appears on screen, since those labels are set the same way.
Part D · Reference
Lookup material, and the question you will ask most often.
D1 · Glossary
- Contact. One person in the loyalty database: a name, a mobile number and/or email address, a date of birth, and the groups they belong to. Created on first app sign-in, through a registration source, or claimed from a physical loyalty card at the till (A2).
- Group. A node in the CRM's group tree. An ordinary or society year-managed group has members and can have children; membership is read upward, so a member of a child group is also treated as a member of every ancestor above it (A3, A4).
- Entitlement pool. A group with no members, and none allowed beneath it either. Its offers are restricted to it exactly like any other group's, but the only way a person gets one is an individual grant (A4, A5).
- Grant. The act — and, loosely, the record it creates — of giving one contact the right to use one of a pool's offers: a number of uses, a validity period and a display reason, all read off the pool (A5, B3).
- Entitlement. What a grant is once it exists: the record on a contact's Entitlements tab that says they may use a particular offer, how many times, and until when. Granting is the action; the entitlement is what results.
- Offer. The CRM's copy of a deal from the POS: a record carrying its own visibility window, its restriction groups, whether it has been built and published, and a usage limit (A1, B4). Never created directly in the CRM.
- Deal. The POS-side thing an offer is imported from. Set up in the POS, not in the CRM (A1).
- POS. The point-of-sale system used at the till. Deals, the Publish to App tickbox that decides whether customers see them, and loyalty-group restrictions are all configured there (A1).
- Venue. A single pub or site. Deals are set up per venue in the POS, and the import (A1) works through the venue list one at a time.
- Registration source. A campaign link or QR code a contact arrives through when they sign up, which can add them to one or more groups at that moment without anyone adding them by hand (A2).
- Society year tree. A society's own branch of the group tree: the society group and the year groups beneath it, built and rolled over automatically by the academic-year clone. Its shape — name and parent — cannot be hand-edited; its operational settings can (A4, B2).
- Preview reviewer. A contact placed in the one group id configured as the environment's reviewer group. A reviewer sees every preview offer in the app that has not yet ended, regardless of group or grant, so a deal can be checked over and signed off in the POS before it reaches anyone else (A6, B4).
D2 · Entitlement source types
Every entitlement pool (A4, B3) carries one of six types, chosen from Entitlement Pool Type on the group form. The type is a label only — it drives what the Entitlements page and a pool's "View all… grants" link filter by, and nothing else about how a grant behaves (B3).
| Label shown in the CRM | What a filtered link carries | What it implies |
|---|---|---|
| Manual | Manual |
The default — a one-off entitlement an admin decided to hand out, with no more specific category. |
| Birthday | Birthday |
A pool used for a birthday offer — the display reason is where "Happy Birthday!" (A5) actually gets typed. |
| Prize / giveaway | Prize |
A pool built for a competition or prize win. Nothing restricts it to any one giveaway tool — it is a label, like every other row here. |
| Campaign | Campaign |
A pool tied to a specific marketing campaign, distinct from an everyday manual grant. |
| Sign-up | SignUp |
The type behind sign-up offers — the ones the bulk Verify action releases to a newly verified contact who arrived through a registration source (B1, A2). |
| VIP | Vip |
A pool for a VIP-style one-off, as distinct from an ordinary VIP group's offers, which reach people by membership rather than by grant (A6). |
The label and the name behind it are not the same word.
"Prize / giveaway" and "Sign-up" are the wording for people; Prize and SignUp are what a filtered Entitlements link carries in its web address, and what the page filters on. If you are working from a link someone has pasted into a support ticket, match it against the middle column above, not the label.
D3 · Field reference
Group fields
| Field | What it does | If left blank |
|---|---|---|
| Name | The group's display name, everywhere it appears — tree, search, every picker. | Required; the form will not save without one. |
| Parent Group | Where the group sits in the tree (A3) — everything above it is inherited by its members, and it inherits nothing from below. | The group becomes a root: nothing above it, and nothing for it to inherit (B2). |
| Stop Date/Time | When the group retires. Once it passes, the group disappears from the tree, search and every picker entirely (B2). | The group never retires on its own; it stays live indefinitely until someone sets a date. |
| Require Photo ID | Whether a member of this group needs a photo on file (B1). | No requirement from this group specifically — a contact can still need a photo because of a different group they also belong to. |
| Hidden | Whether the group is left out of the tree, search and every picker entirely. Not exposed on the group form — something else in the system sets it (B2). | Not applicable; it is not a field you fill in. Every group created here defaults to false (visible). |
| Entitlement Pool Type | Turns the group into a pool of the chosen type (D2), restricted exactly like any group's offers but with no members. | Left on "Not a pool": an ordinary group with members, whatever the other three entitlement fields hold (A4, B3). |
| Uses Allowed | How many times each grant this pool issues can be redeemed. Ignored entirely while the group is not a pool. | Defaults to 1. Typing 0 does not stick — 1 is quietly stored instead, so a pool's grants always allow at least one use however this field is set. |
| Validity (Days) | How many days a grant from this pool stays live, counted from the moment it is granted. | The grant instead runs on the offer's own visibility window (A5, B3). |
| Display Reason | The text appended after "Just for you" on the offer card (A5). | The card reads plainly "Just for you", with nothing appended. |
Offer fields
None of these are typed into the CRM — every one is set by the import from the deal in the POS and rewritten on the next run (A1, B4). "If left blank" below means left blank on the deal in the POS, not on a CRM form.
| Field | What it does | If left blank |
|---|---|---|
| Name | The offer's display name, in the CRM list and on the customer's offer card. | No app copy in the POS yet: stored as Untitled deal followed by the POS deal id, so it can still be found (A1). |
| Description | The offer's marketing copy. Also drives Is Built (B4). | Is Built shows red. For an offer with no restriction group, this also means it reaches nobody until it is written (D4) — a group-restricted or pooled offer is unaffected by a blank description. |
| Visible From / Visible To | The offer's visibility window, taken from the deal's own start and end times in the POS. | Visible To left unset in the POS is stored as never-ending rather than as a blank — the offer does not expire on its own until the POS sets an end date. Visible From always carries a value; there is no blank case for it. |
| Usage Limit | How many times the offer can be used. For a pool-held offer this is a different, global cap — see the warning in B3. | No cap: unlimited redemptions from anyone the offer reaches. |
| Groups (restrictions) | The groups the offer is restricted to, read from the deal's loyalty groups in the POS and matched against the CRM's own group ids. | No loyalty groups on the deal in the POS: the offer is Public and reaches anyone once published and built. See D4 for what happens when the POS names a group that does not resolve — the CRM's Groups column can read "Anyone" without the offer actually being public. |
D4 · Why isn’t this offer showing?
Work through this list top to bottom. It does not assume you have read anything else in this guide, though most of these points are covered in more depth elsewhere and cross-referenced as you go.
- Is Publish to App ticked on the deal in the POS? If not, the deal is imported but withheld from every customer — only a preview reviewer sees it (see below). This is the most common cause, and it is fixed in the POS, not the CRM. Note this is a separate tickbox from the deal's till visibility: a deal can be live at the bar with Publish to App unticked, and customers will not see it.
- Is the offer inside its visibility window? Check the from and to dates, in CRM → Offers.
- Is it built? Check the Is Built dot on the Offers screen. This only matters for an offer with no restriction group — look at its Groups column first: if it names one or more groups, skip this step, since a group-restricted or pooled offer reaches its audience even with no description written yet. If the Groups column reads "Anyone", an unbuilt offer really does reach nobody. If it is built and Groups still reads "Anyone" but nobody can see it, skip to the mirror-image section below — the offer's groups may have failed to resolve on import.
- Is it restricted to a group? If so, is the customer in that group — or in any group beneath it? Remember membership is read upward: someone added two or three levels down still counts as a member of everything above it.
- Is it in an entitlement pool? That is, is the restriction group from the step above actually a pool (D1, A4)? Then nobody sees it without an individual grant, however well they match everything else.
- Has their grant expired or been used up? Check uses consumed against uses allowed, and the valid-to date — whichever of the grant's own dates or the offer's own dates applies (A5).
- Has the customer finished signing up? An unverified contact, or one who has not confirmed they are 18 or over, is redirected to finish that before they can reach the Offers or VIP page at all. This is a whole-app gate, not a per-offer check — it explains a customer who cannot see anything on those pages, not one who sees other offers but not this one. If other offers are showing fine for this customer, this is not your answer.
The mirror image: an offer with no restriction that still reaches nobody
The import matches every loyalty group the POS sends against the CRM's own group ids, and only creates a restriction for the ones that match (B4). What it does not do is work out again whether the offer is Public to match. Public is set from the loyalty groups the POS names — whether it named any group at all — before that matching happens. So if a deal in the POS is restricted to a group that no longer exists in the CRM, the offer gets no restriction for that group, because it does not resolve — but the offer is still marked not Public, because the POS did name a group and the import has no way to know that name was a dead end.
The result is an offer that is neither public nor properly restricted.
The CRM's Groups column reads "Anyone" — it lists actual restrictions, of which there are none — but the offer is not Public either, so it reaches nobody at all, group member or not. If a deal is restricted in the POS and nobody can see it, not even someone in the group it is supposedly aimed at, check that every loyalty group on that deal in the POS still exists as a group in the CRM before assuming the offer is simply public and something else is wrong. Where a deal names more than one loyalty group and only some resolve, the offer is genuinely restricted to whichever ones do — the others just lose their audience silently, with nothing on the offer or in any log to say a group went missing.
The other mirror image: someone sees an offer nobody else can
A preview reviewer (D1, A6) sees every preview offer that has not yet ended regardless of group or grant — overriding every check in the list above, for as long as the offer is Awaiting sign-off.
Check whether they are a preview reviewer before treating it as a bug.
If someone reports they can see an offer nobody else can, and no group membership or grant explains it, check whether they are in the configured reviewer group. The likely answer is that they are looking at exactly what a reviewer is meant to look at: a deal not yet app-visible in the POS. Once that deal is signed off and published, the exemption stops applying, and the reviewer sees it — or not — by the same three routes as anyone else (A6).
Screens change; the concepts in Part A do not. Every page here shows when it was last updated, at the foot of the page — trust that date rather than a printed copy.
Ended: User guide
Case management ↵
Case management
How cases work in the CRM: where they come from, how to find one, what you can do to it, and what happened to the Voicemails screen.
1 · What a case is
A case is one thing a customer sent us that somebody has to deal with — a voicemail, an enquiry, a complaint — held as a single item that can be assigned, worked and closed.
It replaces the old Voicemails screen and generalises it. A voicemail was already almost a case: it had a venue, sometimes a contact, a category, follow-ups and an Actioned/Pending badge. What it could never describe was anything that was not a phone call. A case can.
Every case carries:
- a reference —
CASE-1042— which is what you read out on the phone - a subject — the line staff see in the queue
- a status, a category and a source
- optionally a venue and a contact
- optionally an assignee: a person, a team, or both
- optionally a follow-up date
- a timeline of everything that has happened to it
A case with no contact is normal, not broken.
Plenty of callers are people we hold no record of. The queue shows those as Anonymous rather than as a blank, because it is a real state of a case and not a field somebody forgot to fill in.
Where to find it. CRM → Cases in the left sidebar.
What you need to see it
Access to cases is granted by the case:view and case:edit roles. case:view gets you the queue, a case's detail and its history. case:edit is what lets you raise, assign, restatus, note and set follow-ups on a case.
The old voicemail roles do not grant case access.
voicemail:view and voicemail:edit never granted access to cases, and the Voicemails screen they did grant is gone. Anyone still holding only that pair can still sign in to the CRM, but lands on a bare page with an empty sidebar and nothing they can open. They need case:view or case:edit instead.
Needs confirming
Whether the voicemail roles have since been swapped for the case roles, and for whom. The CRM cannot do this. Roles are granted and withdrawn in Keycloak — the system that decides who can sign in to the CRM and what they can open — so whoever administers Keycloak for the CRM will know where that stands.
2 · Where cases come from
A case records how it reached us, and the queue can be filtered on it. There are four sources on the list, but only two of them actually raise cases today.
| Source | Raised how | Live? |
|---|---|---|
| Voicemail | Automatically, when a voicemail notification email is processed | Yes |
| Manual | By hand, from New case in the CRM | Yes |
| — | Not yet | |
| Contact form | — | Not yet |
Email and Contact form are on the list but nothing creates them.
Both appear in the Source filter because the system knows about them, but no part of the system raises a case from an inbound email or from a website contact form. Contact form submissions still go to an email inbox as they always did. If you filter the queue to either of these you should expect no results.
Voicemail cases
When a voicemail arrives, the notification email is processed automatically and becomes a case:
- Source is Voicemail and the status is New.
- The subject is Voicemail from followed by the calling number, so one call is distinguishable from another in the queue before anybody opens it.
- The venue is worked out from the voicemail extension the call came in on. If no venue matches that extension, no case is raised at all.
- The contact is matched from the calling number, comparing in international format — so 07700 900123 and +447700900123 are recognised as the same person. Where two contacts hold the same number the system declines to guess and leaves the case anonymous rather than attaching it to the wrong person.
- The recording and transcript are stored on the case.
A case raised from a new call arrives Uncategorised and stays that way: a category is only ever chosen by the person raising a case by hand. Voicemail cases migrated off the old screen are the exception — they kept the category they had there. See Categories.
A voicemail notification with no recording attached raises no case.
The recording is what a voicemail case is for, so if the notification email arrives without one, nothing is created and the call does not appear in the queue. The same is true if the extension it came in on matches no venue. If a caller says they left a message and there is no case for it, those are the two things to check.
Raising a case by hand
Press New case on the queue. You will be asked for:
- Subject — required. What staff will see in the queue; short and specific beats complete.
- Category — optional, defaults to Uncategorised.
- Venue — optional. Leave it blank if the case concerns no one venue.
- Contact — optional. Search by name; a case with no contact is fine.
- Opening note — optional, and worth writing. It is filed as the first note on the case's timeline, under your name.
You cannot choose the source.
A case raised through this dialog is always recorded as Manual. That is deliberate: if it could be labelled a voicemail or an email, hand-raised cases would show up in the channel figures as inbound work that never actually arrived.
The case is recorded as raised by whoever is signed in. That comes from your sign-in, not from anything on the form, so a case can never be filed under a colleague's name.
3 · Finding a case
The queue at CRM → Cases shows everything raised across the estate, newest first, 25 to a page.
The columns
| Column | What it shows |
|---|---|
| Reference | CASE-1042. Click it to open the case. |
| Subject | The line the case was raised under. |
| Status | New, Open, Waiting, Resolved or Closed. |
| Source | Voicemail, Email, Contact form or Manual. |
| Venue | The venue it concerns, or a dash if it concerns no one venue. |
| Contact | The customer, linked through to their contact record — or Anonymous. |
| Assignee | The person it sits with; the team, if it has no named person; otherwise Unassigned. |
| Created | When it arrived. |
| Due | The follow-up date, if one is set. |
The filters
Five dropdowns above the table: status, assignee, team, venue and source.
They combine with and, not or. Picking a person and a venue gives you that person's cases at that venue, not everything belonging to either. The five filters are held in the page's web address, so a filtered queue can be pasted to a colleague or bookmarked and it will come back filtered the same way. The page number is not: a bookmarked or shared link always opens at page 1.
There is no search box, and no sorting.
You cannot search the queue by reference, subject, phone number or customer name, and you cannot re-sort it — the order is always newest first. To find a specific case, narrow it with the filters and page through, or open it directly if you have its reference.
Reference numbers
A case's reference is CASE- followed by its own internal number: CASE-1042. They are allocated in order as cases are raised, and are never reused. Among cases migrated off the old Voicemails screen the numbering reflects the order they were copied across rather than the order the calls came in, so do not read a reference as a reliable stand-in for a date — the Created column is the date. There is no venue code, date or random suffix in them — a reference has one job, which is to be read out over the phone and typed back correctly.
4 · The case detail page
Opening a case shows its reference and subject at the top, with the status dropdown beside them.
Case facts
Status, source, category, contact, venue, assignee, when it was raised, when the follow-up is due, and when it was resolved. Every one of these is shown even when it is empty, so a missing venue is visibly missing.
Voicemail
Cases that came from a phone call carry an extra panel with the calling number, the transcript and the recording. The panel appears when the case has a voicemail attached to it — not because of what its Source says — so a case with no voicemail on it simply does not show the panel, whatever its source.
Where the calling number was not passed through, the panel shows Withheld in its place.
The transcript is a machine's best guess at a phone call.
It is generated automatically. A mangled name, address or postcode is a transcription to check against the recording, not what the caller actually said. The page says so under every transcript. Play the recording if anything reads oddly.
The panel copes with either half being missing: a transcript with no recording, or a recording with nothing transcribed. Where there is no recording it says so in as many words, rather than leaving a play button missing. The link the player uses is short-lived — an hour — and the player prints the exact time under itself, as Audio URL expires at …. An expired link fails as a dead player rather than as an error message, so if nothing happens when you press play, check that time and reload the page for a fresh link.
History
The case's timeline, oldest first — a case's own history reads forwards as a story, even though the queue of cases reads newest first. Each entry says what happened, when, and who did it.
| Entry | What it means |
|---|---|
| Note | Something a member of staff wrote down. |
| Status changed | Carries the status it moved from and the one it moved to. |
| Reassigned | Carries who or which team held it before, and who holds it now. |
| Follow-up set | A follow-up was set, moved or cleared, with whatever reason was typed at the time. |
| Message sent | A reply went out to the customer. |
| Message received | The customer got back in touch. |
The two message entries cannot appear yet.
Nothing in the system currently sends replies from a case or files inbound customer messages onto one. The timeline knows how to display them for when that arrives; today you will not see one.
Every follow-up entry reads \"Follow-up set\", including a clear.
The timeline shows the reason typed at the time but not the dates themselves, and it uses the same wording whether the follow-up was set, moved or removed. The reason is therefore the only thing distinguishing them — which is a good argument for always typing one. The current due date is on the case itself, under Due.
Internal notes
Below the timeline is a box to add a note. Notes are the substance of a case — what was tried, what the customer said, what happens next — and are the thing staff add far more often than they change a status.
A note is internal. The customer never sees it.
Notes are not correspondence, and nothing in the system can send one to a customer, which is why they are marked so heavily on screen. Correspondence with a customer, when replying from a case arrives, will land in this same timeline as a separate kind of entry — so the distinction is carried in words rather than in a colour.
A note is filed under whoever is signed in. Adding one does not change the case's status: writing down a detail while triaging is not the same as picking the case up, and if it were, the queue of unworked cases would empty itself every time somebody made a note.
5 · Statuses
Change a case's status from the dropdown at the top right of the case.
| Status | What it means |
|---|---|
| New | Raised, and nobody has picked it up. |
| Open | Being worked. |
| Waiting | Parked, waiting on the customer to come back to us. |
| Resolved | Dealt with, as far as we know. |
| Closed | Deliberately signed off and finished with. |
There is no fixed order and no gates: any status can be set from any other. Setting a status to what it already is does nothing and writes nothing to the timeline.
Why Resolved and Closed are not the same
This is the distinction most worth understanding.
Resolved means we believe we have dealt with it. Closed means somebody has deliberately signed it off. They are kept apart because a customer can come back on a case we thought was finished, and a customer reopening something we called resolved is not the same event as somebody reopening a case that was deliberately closed.
They are also stamped separately: a case records when it was resolved and, separately, when it was closed. Resolving is the moment the customer's problem stopped; closing is administrative and can happen days later. Keeping one timestamp for both would date every resolution to its paperwork instead of to the day it was actually dealt with.
Two behaviours follow from that:
- Moving a case out of Resolved to anything other than Closed clears its resolved timestamp. A case somebody is arguing with is not a resolved one, and would otherwise still be counted as one. The timeline keeps the record of the resolution that was undone.
- Closed is terminal. When replying from a case arrives, a customer message on a Resolved or Waiting case will bring it back to Open — a reply on a resolved case is the ordinary way a resolution turns out to have been wrong, and Waiting means waiting on the customer, so their reply is exactly the thing the case was parked for. A message on a Closed case will not reopen it: it was signed off, and reopening would rewrite numbers already reported on.
Nothing stops you closing a case by hand at any point.
The terminal behaviour above is about what an incoming customer message does to a case, not about what you are allowed to do. You can move a Closed case back to Open yourself if it was closed in error.
6 · Assignment
The Assignment panel on a case has two dropdowns — a person and a team — and a Save assignment button.
They are independent. A case can sit with a team before anyone has picked it up, and assigning it to a person as well is what gives it an owner. Neither implies the other, and both can be empty: assigned to nobody is a real state, not a mistake.
Assignment is a draft you confirm, not two dropdowns that save themselves.
Person and team are saved together, so nothing saves until you press Save assignment. Changing one dropdown and walking away changes nothing.
Every reassignment is written to the timeline with the names of who held it before and who holds it now.
Who appears in the dropdowns
The staff list maintains itself: a staff record is created the first time somebody signs in to the CRM, so anyone who has used it is already assignable. Deactivated staff are kept forever so that historic assignments stay readable, but they are not offered as assignees.
The one thing that cannot happen automatically is putting a new starter on the list before their first sign-in, which is exactly when their work has to go somewhere. CRM → Staff & Teams (administrators only) can add them by name and email; their first sign-in matches onto that record rather than creating a duplicate. The same screen creates and retires teams, and moves a staff member between them.
Look for Staff & Teams, not Staff.
The sidebar item directly above it is Staff Party, which is an unrelated screen.
Teams and staff are retired, never deleted.
Cases already sitting in a team's queue keep pointing at it, and timeline entries naming a person or a team have to stay readable after they have gone.
Removing somebody from the assignment list does not keep them off it.
A staff record is reactivated every time they use the CRM at all — signing in is taken as proof of current access. So anyone who can still log in reappears in the assignee dropdowns almost immediately after you remove them, and nothing tells you it happened.
Removing somebody from the list is therefore only useful for people who can no longer sign in. To actually remove a leaver, their access has to be withdrawn in Keycloak — the system that decides who can sign in to the CRM. Doing it only in the CRM will look as though it worked and will quietly undo itself.
7 · Follow-ups
A follow-up is a promise to come back to something. It is the Due date on the case and in the queue — always a date in the future, and always something still owed.
Follow-ups carried over from voicemails do not mean this.
On the old Voicemails screen a follow-up recorded a call-back that had already been made. Those came across as timeline entries and set no due date on anything — see What happened to the Voicemails screen.
The Follow-up panel has a date and time picker, an optional Why box, and buttons to set, change or clear.
- Set or Change follow-up writes the date onto the case.
- Clear follow-up removes it. The button only appears when there is one to clear.
Clearing a follow-up is an action, not an omission.
Emptying the date box is not the same as clearing the follow-up, which is why the picker has no clear button of its own and clearing is a button in its own right. Dropping a promise to ring somebody back is a decision somebody made, and it is written onto the timeline as one — with whatever you typed in the Why box as the reason.
Whatever you type in Why attaches to the change you are making, not to the date, and it is as useful on a clear ("customer sorted it themselves") as on a set ("ring back Thursday"). It is cleared once the action has been written.
Nothing reminds you when a follow-up is due.
There is no alert, no email and no overdue filter. The due date shows in the Due column of the queue and on the case, and that is all. If follow-ups matter to how your team works, somebody has to look at the queue.
8 · Categories
A case's category comes from the list carried over from voicemails — the same categories, unchanged, because every migrated voicemail was moved across on it and inventing new values would have baked in guesses staff then had to live with.
| Category | Used for |
|---|---|
| Uncategorised | The default. Every automatically raised voicemail case starts here. |
| Lost property | Something left at a venue. |
| Booking enquiry | Questions about a booking. |
| Customer issue | A complaint or a problem with a visit. |
| Police | Contact from the police. |
| Utilities | Suppliers and utilities. |
| Cold call | Sales calls and the like. |
A category is set when the case is raised and cannot be changed afterwards.
There is no category dropdown on the case detail page and no way to recategorise a case once it exists. Voicemail cases migrated off the old screen kept whatever category they had there, but a call arriving now becomes an Uncategorised case and stays one. If recategorising matters to your reporting, it needs raising as a change.
9 · What happened to the Voicemails screen
Now its own page: What happened to the Voicemails screen.
10 · Not in the CRM yet
Things a case system might be expected to do that this one does not do today. None of these are broken; they have not been built.
- Replying to a customer from a case. There is no reply box. Correspondence is handled outside the case, exactly as it was before.
- Attachments. A case can hold files in principle, but there is nothing in the CRM that uploads, lists or opens one.
- Editing a case after it is raised. Subject, category, venue and contact are set when the case is created and cannot be changed. There is no way to delete a case.
- Searching or sorting the queue. Filters only, newest first.
- A cases dashboard. No counts, no per-person workload view, no overdue list.
- Follow-up reminders. Covered in Follow-ups — nothing chases you.
11 · Roles
The other reference tables sit with the sections that explain them: sources, statuses, categories and timeline entries.
| Role | Grants |
|---|---|
case:view |
The queue, a case's detail, its timeline and its recording. The staff and team lists. |
case:edit |
All of the above, plus raising, assigning, restatusing, noting and setting follow-ups — and creating, editing and deactivating staff members, and creating and retiring teams. |
admin |
All of the above, plus the CRM → Staff & Teams screen itself. |
case:edit carries more than the case workspace.
Only administrators get the Staff & Teams screen, but the permission to change staff and teams is granted by case:edit itself. Anyone with it can add, rename or deactivate a staff member and create or retire a team. Worth knowing before granting it widely.
What happened to the Voicemails screen
This page is part of the case management guide, kept separately because it stops being useful once nobody remembers the old screen.
The Voicemails area has been removed from the CRM. It is not hidden behind a role and it is not somewhere else in the menu — it is gone, along with everything behind it.
Everything it showed is now in CRM → Cases:
| On the old Voicemails screen | Where it is now |
|---|---|
| The list of calls | The case queue, filtered to Source: Voicemail |
| The list it opened on | Source: Voicemail and Status: New — see below |
| The transcript | The Voicemail panel on the case |
| The recording | The Voicemail panel on the case |
| The calling number | The Voicemail panel on the case, and in the case's subject |
| The category | The case's category |
| Actioned / not actioned | The case's status: an actioned voicemail became Resolved, an unactioned one New |
| Follow-ups | Follow-up set entries on the case's timeline |
Every voicemail that existed was copied onto a case. Each one kept the call's own date and time, so age and backlog still mean what they meant — historic calls were not all re-dated to the day the move ran.
Getting your old working list back
The old screen opened on Pending Action — calls nobody had dealt with yet. The case queue has no default filter and opens on everything, so Source: Voicemail on its own gives you the entire history of calls, including every one already handled.
The equivalent of the old default is Source: Voicemail and Status: New.
Unactioned voicemails became New and actioned ones became Resolved, so those two filters together are the list the old screen used to open on. Set both and bookmark it — filters survive in the page's web address.
Old follow-ups may name somebody without linking to them.
On the old screen, whoever followed a call up was typed into a box as free text. Where that text matched a staff member by email or name, the timeline entry is attributed to them. Where it did not — a typo, or an informal name like "Sam on the bar" — the entry shows the name exactly as it was typed but is not linked to anybody. That is deliberate: minting a staff member out of a typed name would create a person you could then assign real work to.
A migrated follow-up is a record of a call-back that already happened, not one that is due.
The word means two different things either side of the move, and the screen does not distinguish them. On the old Voicemails screen a follow-up was a free-text note about a call-back somebody had already made. On a case, a follow-up is a future due date — see Follow-ups.
Migrated follow-ups are the first kind. Each one is a timeline entry dated to when the call-back happened, and no migrated case has a due date at all — the move did not set one on anything. But the timeline heads every follow-up entry with the words Follow-up set, so a migrated entry reads as though somebody scheduled a call-back that has long since gone past. It did not. If a migrated case has nothing in its Due field, nothing is outstanding on it.
A migrated case with no follow-ups has an empty timeline.
It will say Nothing has happened to this case yet. That is correct rather than broken: the old screen recorded nothing about a call except the call itself, so there was nothing to copy across.
The case is now the only copy.
The old voicemail records have been deleted. Every transcript, recording, calling number, category and follow-up now exists only on the cases they were copied to. Nothing can be recovered from the old screen, because there is nothing left behind it.
Ended: Case management
Societies & promotions ↵
Promoted Items & Societies
How to use Promoted Items and Societies in CRM, and what your members see in the app.
1 · Promoted Items
What it is for. Promoting individual menu items at a venue price so a venue's public website can show them — for example Guinness, Pint, £3.50, 2-for-1 before 7pm.
Where to find it. CRM → Promoted Items in the left sidebar.
The one thing to understand first
Prices are never stored in CRM.
You are not typing a price. You are pointing at a price that already exists on the till, in a non-default POS price tier — a happy-hour or food-deal tier. The website reads that price live. Change it on the till and the website follows, with no CRM edit at all.
This means a price tier must already exist at the venue before you can promote anything from it. If the tier you want is not in the dropdown, it needs setting up in POS first.
Adding a promoted item
- Choose the venue at the top of the page. The list below is always for one venue.
- Press Add.
- Pick the Price Tier — the happy hour or deal the price comes from.
- Pick the Menu Item. Type in the search box to filter. You are choosing a specific item and unit of sale: Guinness Pint and Guinness Half are two separate choices, because the till prices them separately.
- Write the Promo Text — the free-text line the website shows, e.g. "2-for-1 before 7pm".
- Optionally set a Display Name to override how the item is named publicly. Leave it blank to use the POS name.
- Save.
Changing the price tier clears your item choice.
That is deliberate — items are priced per tier, so a pick from the old tier may not exist in the new one. Re-pick the item after switching.
Reading the list
| Column | What it shows |
|---|---|
| Product | The item name, with the unit of sale beneath it. If you set a Display Name, the real POS name shows underneath so you can still tell what it is. |
| Price | Fetched live from the till, not from CRM. |
| Price Tier | Which tier the price comes from. |
| Promo Text | The line the website displays. |
Ordering
Use ▲ Up and ▼ Down to set the order the website shows them in. There is no drag-and-drop.
An amber row saying "— no longer priced in this tier"
The item has fallen out of its tier on the till.
Someone removed that price in POS, so there is nothing for the website to show. The row is highlighted amber and the price is replaced with that message.
What to do: either restore the price in POS, or point the row at a different tier, or delete it. Leaving it will show nothing useful publicly.
If the till is unreachable altogether, rows are not marked amber — an outage is deliberately kept distinguishable from a genuinely missing price, so you never delete a good row during a POS blip.
Retiring a promotion
There is no on/off switch and no date range.
To retire a promotion, delete the row. Availability is whatever the price tier itself says — the tier's own start and end dates and its day-of-week windows are what the website honours.
So a happy hour that only runs Mondays 5–7pm needs no CRM dates: set that on the tier in POS, and the promoted item inherits it.
2 · Societies — in CRM
Where to find it. CRM → Societies.
Adding a society — the wizard
Press Add Society. This opens a wizard, not the old form.
Why it changed.
The old Add form asked you to pick a group from a flat dropdown of every group in the estate — so the tree had to be built by hand first, then picked from correctly. Those were the two steps most likely to file a society under the wrong year. The wizard reads the tree instead, and shows you the path before anything is written.
| Field | Notes |
|---|---|
| Academic year | Proposed for you — the next year after the latest one that exists. |
| Valid from / Valid to | Prefilled from the year. These decide when the society is joinable and when it goes read-only. |
| Institution | Pick an existing one, choose New institution… and name it, or Directly under the year group for none. |
| Society name | The society as people call it. |
| Group name | Proposed automatically as the year token plus the society name. Edit it if your naming differs — once edited, it stops following the society name. |
| Home venues | The venues associated with the society. |
Where it will go. The wizard shows the full group path as you fill it in. Read that line before submitting — it is the whole point of the wizard.
If the wizard will not submit
Two messages stop it, both about the year group rather than anything you typed:
- "No group names academic year X, and no earlier year exists to derive one from." — create the year group first.
- "More than one group names academic year X." — the wizard cannot tell which to use. Resolve the duplicate naming.
Editing a society
Edit on a row opens the plain form — a different set of fields from the wizard:
| Field | Notes |
|---|---|
| Group | The contact group whose members are the society. Drives offer eligibility and rebate reporting. |
| Academic Year | The year this record is for. |
| Valid From / Valid To | The active period. |
| Home Venues | Associated venues. |
Changing Group moves the society — read the path before you do.
Each option shows its full path, e.g. Universities / 2026-27 / Liverpool Uni / 26 Chess Club, sorted so siblings sit together. That is there so you can tell the right academic year from an identically named group under the wrong one. Nothing validates it for you, so read it.
The consequence is the part to weigh. This society already has members, and its group drives offer eligibility and rebate reporting — re-pointing it moves both. If you need to change a society's group, check with whoever owns reporting first.
Everything else on this form — the year, the dates, the home venues — is safe to edit.
Valid From / Valid To decide almost everything.
A society only appears on the customer app's Join a society list while today falls inside that period. Once Valid To passes, the society goes read-only — see section 3.
Managers and Visits
Two further dialogs on each society row. Managers sets who runs the society — these are the people who approve join requests in the customer app, so this is the first thing to check when a member says nobody is responding. Visits records society visits.
Cloning an academic year
At the end of a year, rather than rebuilding every society by hand, you can clone a whole year's societies into the next one.
- Open the clone dialog from the Societies page.
- Enter the source year and target year, and the Valid From / Valid To dates the new societies should carry.
- Press Preview. Nothing is written yet.
- Read the plan. For each society it shows the source group name, the new name, and how many members, managers and home venues would carry over. It also shows, level by level, whether each group in the tree would be created or an existing one reused.
- Check the warnings list, if there is one.
- Only then press Clone.
Preview is compulsory, by design.
The Clone button stays disabled until you have previewed. If the preview reports errors — as opposed to warnings — the run refuses outright rather than guessing at a group tree it cannot read. Fix the naming it complains about and preview again.
A society already present in the target year is skipped rather than duplicated, and the preview tells you which ones and why. If a clone fails partway, nothing is written.
Society rebate reports
The three society rebate reports under CRM → Reporting — spend, Friday fixed and weekend — are unchanged by this work and behave as they always have. They are not covered here.
Locking the year trees
Found under CRM → Groups, as Lock society year trees.
The year clone builds a tree of groups. Locking those trees stops new groups being hand-added inside them, which keeps the structure the clone depends on from drifting out of shape between years.
- Open the dialog. It previews automatically — the boundary of each tree is worked out by reading the estate, rather than firing blind.
- Read the count: "N groups to lock", plus how many are already locked.
- Press Lock N groups.
The button stays disabled when there is nothing to do. "No society trees found to lock" means exactly that — it is not an error.
Run this after a clone, not before.
A clone creates the new year's groups; locking afterwards protects what it has just built. If a later clone preview complains about a tree it cannot read, hand-added groups in an unlocked tree are the usual cause.
3 · Societies — what customers and managers see
This all lives in the customer app, not CRM. Worth knowing because it is what your members will ring up about.
For a member
| Screen | What happens there |
|---|---|
| My societies | The societies they belong to. A prompt — "Looking to join one?" — leads to the join page. |
| Join a society | Lists societies whose valid period covers today. They pick one and request to join. The page then shows Request pending. |
A join request is not a membership. Until a manager approves it, the person gets no society offers and does not appear in rebate reporting. That separation is deliberate.
For a society manager
Managers open their society and see a Pending requests section above the member list, so requests are in front of them whenever they visit. From there they approve or decline. They can also Add new member directly by mobile number.
Emails sent automatically
| When | Who gets it |
|---|---|
| Someone requests to join | The society's managers. The link in the email goes straight to that request. |
| A request is approved or declined | The member who asked. |
When the year ends
Past societies become read-only.
Once Valid To has passed, the members page shows "This society's year has ended. Its member list is read-only." Members are visible for reference, but nobody can be added, removed, approved or declined.
This is the normal end-of-year state, not a fault. If a manager needs to change a past society, the dates in CRM are what to look at.
Two things people ask
"I declined someone by mistake." They can simply request again — declined requests do not block a fresh one. The declined row is kept for audit.
"Why can't I see the society to join?" Almost always because today falls outside its Valid From / Valid To, or its group is hidden. Both are CRM settings.
4 · Quick reference
Common situations
| You see… | It means… | Do this |
|---|---|---|
| Amber row, "no longer priced in this tier" | The price was removed from that tier on the till | Restore it in POS, re-point the row, or delete it |
| The price tier you want is missing | It does not exist at that venue yet | Set the tier up in POS first |
| Clone button will not enable | You have not previewed, or the preview found errors | Preview; fix any naming it reports; preview again |
| "No group names academic year X" | The year group does not exist yet | Create the year group, then re-open the wizard |
| "More than one group names academic year X" | Duplicate year-group naming | Resolve the duplicate before adding societies to that year |
| "This society's year has ended" | Valid To has passed | Normal. Check the dates in CRM if it is wrong |
| A society's members lost their offers | Its Group may have been changed on the Edit form | Check the society's group; that field moves eligibility and rebate reporting with it |
| A society is missing from the join list | Outside its valid period, or its group is hidden | Check Valid From / Valid To in CRM |
Worth remembering
- Promoted item prices are never stored by us. The till is the source of truth.
- Retiring a promotion means deleting the row — there is no off switch.
- Promotion timing lives on the POS price tier, not on the promoted item.
- A pending join request grants nothing until approved.
- Always preview a clone. It is the only view of what it will do.
- Add Society uses the wizard; Edit uses the old form. They ask for different things.
- Read the full path before changing Group on the Edit form — it moves offer eligibility and rebate reporting.
- Lock the year trees after a clone, so the structure cannot drift before the next one.
Screens change; if something here does not match what you see, trust the screen and let us know.